.png)
To find every weapon upgrade location in Mina the Hollower, you must be very resourceful and persistent, as many are hidden in the most dangerous and remote corners of the Tenebrous Isle. Although at least one of each weapon type is available in the Ossex weapon shop, exploration, and especially knowing where to find the secret weapon merchant, are key.
Here's every weapon location in Mina the Hollower.
All weapon upgrade locations in Mina the Hollower
Mina the Hollower offers a total of five weapons. Each of these weapons can be upgraded twice. While you only receive one weapon at the start of the game, eventually, you can obtain more and switch between them in the Underlab. To upgrade a weapon, you must purchase or find an additional copy of that same weapon. There are three locations where you can find or purchase multiple weapon upgrades: Legovich's Arms in Ossex, the shipwreck in Loner's Landing, or Panino's shop in Ossex.
Legovich's Arms — Ossex
Luckily, the general weapon shop in Ossex (Legovich's Arms) is easily reachable and has one of each weapon type in stock. Let's say you chose the Nightstar as your first weapon; this means you can purchase the four remaining weapons plus your first Nightstar upgrade (Dread Mace) at the Ossex weapon shop. Beware that the first purchase costs 2,000 bones, but every additional purchase costs 2,500 bones. You can find the weapon shop here, in Ossex City Center:
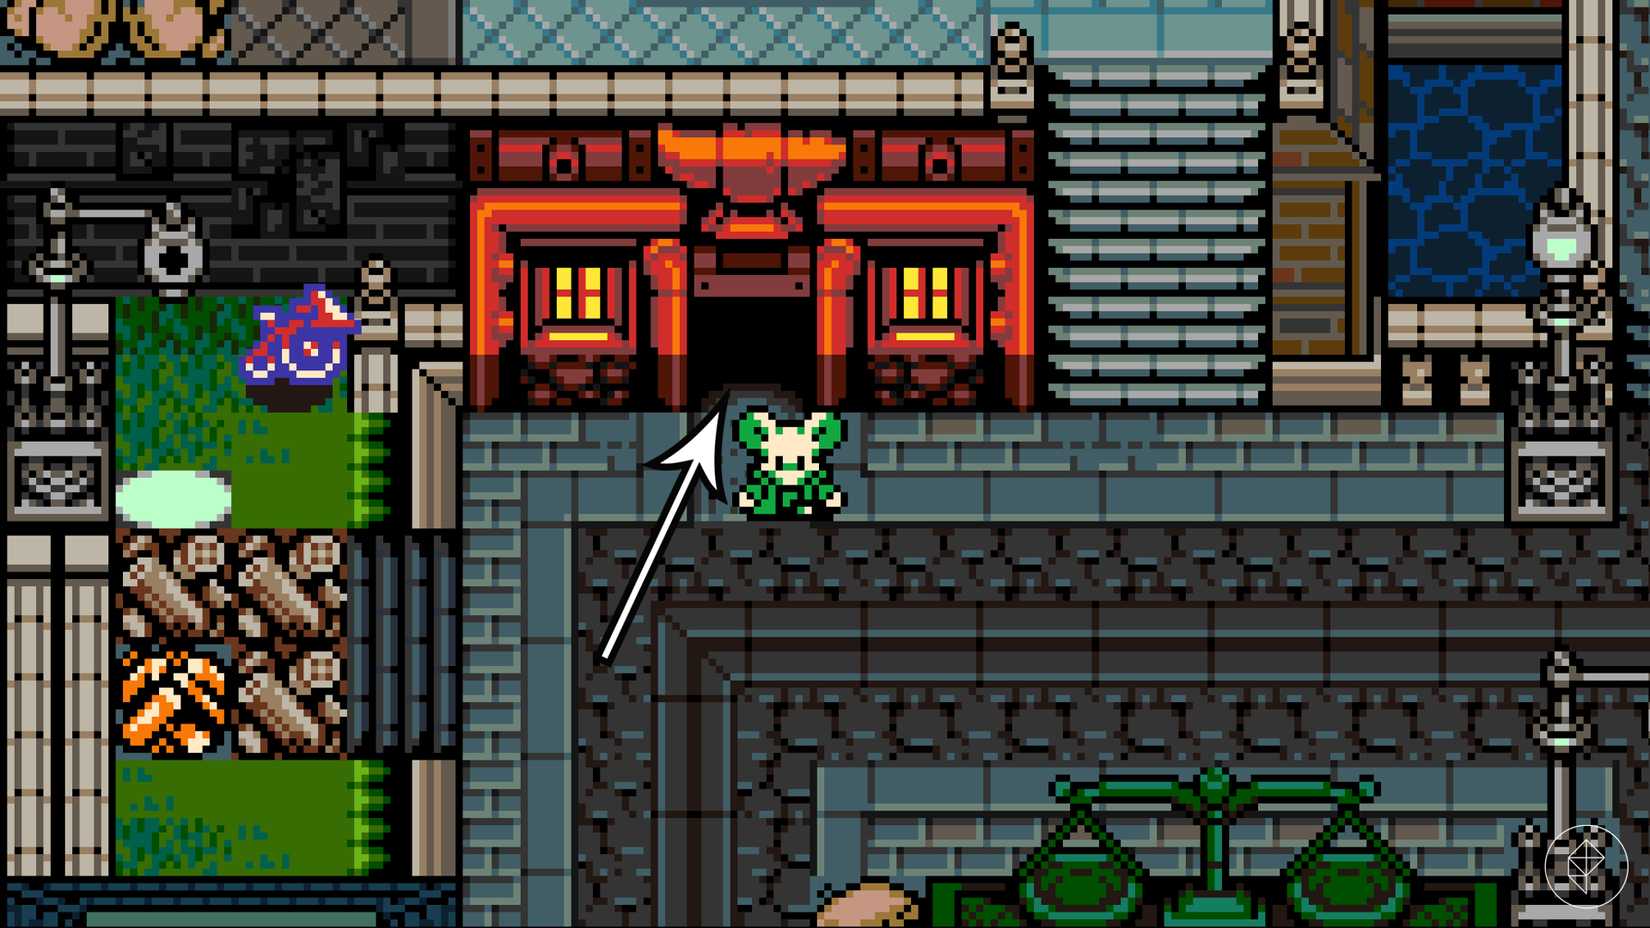 Graphic: Marloes Valentina Stella/Polygon | Source images: Yacht Club Games via Polygon
Beware that Legovich's jealous brother will steal your second purchase, so you must defeat him (burrow through the gap inside the shop) to reclaim that item. The store won't be available until you've done so. In case you've already obtained the first copy of a weapon elsewhere, you can still purchase the same weapon at the weapon shop, but it will count as an upgrade.
Shipwreck in Loner's Landing
The second key weapon location in Mina the Hollower to look out for is the shipwreck in Loner's Landing. Don't worry about this if you've just begun your adventure, but after you've visited Ossex for the first time, you can find a secret path to the shipwreck and buy the two starting weapons you didn't pick. Beware that you should bring three kears (keys) with you.
To find this path, enter the Shanty Swamp: Backwaters area west of Ossex and steal Pinky's ladder. Equipped with the ladder, leave the large lake area with the circling platforms to the southeast, passing the train station, and walk down the Loner's Landing beach. Use the ladder to climb the ledge, then jump across the barrels and burrow through the damaged hull to enter the ship.
 Graphic: Marloes Valentina Stella/Polygon | Source images: Yacht Club Games via Polygon
Inside the ship, defeat the red frog and spend a kear to open the path to the south. To grab the weapons, hit the seaweed in the north (this removes the seaweed on the south side) and spend one additional kear per weapon.
 Graphic: Marloes Valentina Stella/Polygon | Source images: Yacht Club Games via Polygon
Panino's shop — Ossex
The third and final weapon shop in Mina the Hollower is in the Station Underside in Ossex, situated between the Bowery and the train station. A merchant named Panino sells the Battery Buster and Guardian Casket for 3,250 bones each. Additionally, we've noticed that the price of Panino's wares will go up as you restore more spark generators. After two, the price went up to 3,500 bones, and, after six, the price went up to 5,000 bones. So, make sure to grab these while they're cheap!
If you've already obtained the base weapons, you will receive the second upgrade instead. Beware, however, that Panino's weapon upgrades can also be obtained in the wild, for free! So, before you make a purchase, consider very carefully whether you'd like to spend your bones.
To reach Panino's shop, enter Station Underside from the north by burrowing through the hole at the train station.
 Graphic: Marloes Valentina Stella/Polygon | Source images: Yacht Club Games via Polygon
Climb down the rope until you match Mina's position in the example below, then jump to the other rope (you don't need a special item).
 Graphic: Marloes Valentina Stella/Polygon | Source images: Yacht Club Games via Polygon
Climb up, spend four plasma vials, and have a chat with Panino. Beware that Panino needs time to collect your items. After making a purchase, you must wait a while to collect the goods. Never mind Panino's talk about spark generators, though; you don't actually need to restore a spark generator to claim your purchase.
All Nightstar weapon locations in Mina the Hollower
- Base weapon: A crushing mace. Strike your enemies from a distance.
- Upgrade #1: Dread Mace. Deal extra damage when striking enemies with the tip of your weapon.
- Upgrade #2: Afterstrike. Hold the attack button for an extra pulse of damage. Keep holding to flail.
If you didn't pick Nightstar as your first weapon, you can find one Nightstar in the Loner's Landing shipwreck as described above, and purchase another at Legovich's weapon shop in Ossex.
The third Nightstar weapon location is in Ossex's Courtyard, but beware that you'll need at least five plasma vials to get it. If you meet the requirement, go to Panino's shop as described above (enter the Station Underside from the train station, jump to the second rope, and sacrifice four plasma vials), then break the porous stone in the northeast and burrow to the Courtyard.
 Graphic: Marloes Valentina Stella/Polygon | Source images: Yacht Club Games via Polygon
Clear the path to the northeast and visit the Underlab to replenish your plasma vials, then return to fight the lion knight. When he's down, hit the weeds and open the red chest to get the final Nightstar upgrade.
All Blaststrike Maul weapon locations in Mina the Hollower
- Base weapon: A hammer with explosive force. Hold the attack button to charge up. You can roll while charging.
- Upgrade #1: Boom Charge. Hold the attack button longer to charge up an explosive strike.
- Upgrade #2: Spin Rush. After attacking, press the attack button when Mina flashes to dash forward, hammer first.
If you didn't pick the Blaststrike Maul as your first weapon, you can find one Blaststrike Maul in the Loner's Landing shipwreck as described above, and purchase another at Legovich's weapon shop in Ossex.
The final Blaststrike Maul weapon upgrade location is in Nox's Bayou: Big Lagoon, a region west of Ossex. You'll need one kear to obtain it. Starting from the Shanty Swamp train station, travel west to enter Nox's Bayou. Keep following the path until you reach the very large purple area. If you've previously unlocked the shortcut through Lucky's Lair, which leads from the Shanty Swamp directly into the Big Lagoon, use that instead.
 Graphic: Marloes Valentina Stella/Polygon | Source images: Yacht Club Games via Polygon
In the top right corner of the large purple area, enter the Swamp Shack managed by the Kindly Hag merchant. The Blaststrike Maul is in the treasure chest behind the kear tile in the top left.
All Whisper and Vesper weapon locations in Mina the Hollower
- Base weapon: A pair of nimble daggers. Tap the attack button to stab in quick succession.
- Upgrade #1: Lunging Cut. Press attack and jump simultaneously to perform an advancing slash.
- Upgrade #2: Throwing Dagger. Hold the attack button to charge, then toss one dagger. You move faster but fight slower with one dagger.
If you didn't pick Whisper and Vesper as your first weapon, you can find one Whisper and Vesper in the Loner's Landing shipwreck as described above, and purchase another at Legovich's weapon shop in Ossex.
To obtain the second Whisper and Vesper weapon upgrade, visit the Queensbury Crypt east of Ossex. Standing in front of the crypt's entrance, you can spot the red chest on the left balcony. To reach it, head inside and break the vase on your left, then hit the wall behind it. This will reveal a hidden path leading to the Whisper and Vesper upgrade location.
 Graphic: Marloes Valentina Stella/Polygon | Source images: Yacht Club Games via Polygon
All Battery Buster weapon locations in Mina the Hollower
- Base weapon: A dynamic blaster. Switch between melee and ranged modes. Hit enemies to replenish bullets.
- Upgrade #1: Burst Shot. While in ranged mode, hold the attack button to charge up a stronger shot.
- Upgrade #2: Charge Swing. While in melee mode, hold the attack button to charge up a stronger swing.
There are two Battery Buster weapon locations in Ossex; one is in Legovich's general weapon shop, and the other is Panino's Station Underside shop. The first sells either the base weapon or the first upgrade, while the latter sells either the base weapon or the second upgrade. Remember, if you're planning to find all Mina the Hollower's weapon locations in the wild, you don't need Panino's shop!
To find the third Battery Buster location, find the mirror in Bone Beach (it's the open tent on the Worm's Back). Starting from the ledge on the right side of the mirror tent, jump across the purple flowers to reach a hidden area on the next screen, where you'll find the Battery Buster.
 Graphic: Marloes Valentina Stella/Polygon | Source images: Yacht Club Games via Polygon
The final Battery Buster location is in the Astral Orrery: Stellarium, which is the area north of Mirror's End. Complete either the blue Gravity route, which starts in the northeast, or the red Cog route that begins in the southeast to reach the red chest with the final Battery Buster weapon. You must spend one kear to claim it.
 Graphic: Marloes Valentina Stella/Polygon | Source images: Yacht Club Games via Polygon
All Guardian Casket weapon locations in Mina the Hollower
- Base weapon: A sturdy shield. Tap the attack button to bash, hold it to block. Bash as you get hit to parry.
- Upgrade #1: Coffin Toss. Double-tap the attack button to toss the shield, and again to recall. Hop onto it for a blast jump.
- Upgrade #2: Grave Counter. Parry with good timing to unleash a stronger attack.
There are two Guardian Casket weapon locations in Ossex; one is in Legovich's general weapon shop, and the other is Panino's Station Underside shop. The first sells either the base weapon or the first upgrade, while the latter sells either the base weapon or the second upgrade. Remember, if you're planning to find all Mina the Hollower's weapon locations in the wild, you don't need Panino's shop!
The third Guardian Casket location is in Septemburg's Crow Town, in the large central area with all the burning houses. If you've already unlocked the Septemburg mirror location, pass through it and walk upstairs to find the Guardian Casket. If not, find the burning house in the lower left corner of Crow Town, the one with the red chest on the balcony, and approach the front door. A crow will burst out; defeat this enemy, as well as the ones inside, and walk upstairs to find the weapon in the red chest.
 Graphic: Marloes Valentina Stella/Polygon | Source images: Yacht Club Games via Polygon
To obtain the final Guardian Casket, take the train to Coltrane Peak. From there, take the path to the south, then circle toward the northeast as you fight your way through the Dead Man's Gorge. Eventually, you'll reach Coltrane Peak: Rail Yard.
See the gap below the rails in the southeast corner? To pass through, go to the ledge in the north (where you'll find the passenger ghost) and jump to the left, then immediately burrow beneath the rails.
 Graphic: Marloes Valentina Stella/Polygon | Source images: Yacht Club Games via Polygon
Follow the path toward the northwest, passing the purple knight. Open the red chest to find the Guardian Casket weapon upgrade.
 Graphic: Marloes Valentina Stella/Polygon | Source images: Yacht Club Games via Polygon


![ELDEN RING NIGHTREIGN: Deluxe Edition [FitGirl Repack]](https://i5.imageban.ru/out/2025/05/30/c2e3dcd3fc13fa43f3e4306eeea33a6f.jpg)
 English (US) ·