.png)
.png) 4 months ago
95
4 months ago
95


Published Mar 14, 2026, 11:46 PM EDT
Laurence is an avid writer, gamer, and traveller with several years of journalistic writing experience under his belt. Having helped create a student-focused magazine at university, he is keen to reach the gaming community with his guides and game reviews.
Whether it's trudging through the world of Elden Ring, or grinding out raids in Old School Runescape, Laurence is always up for a challenge. However, in real life, his current challenge is learning how to speak Spanish and cooking authentic Mexican cuisine.
Sign in to your DualShockers account
Slay The Spire 2 has been an incredible success for the team over at Mega Crit and has revolutionised the game in so many ways: new events, new cards, and even new characters for hungry Roguelike fans to enjoy.
However, not everyone got through the new release unscathed. While we are still blessed with Ironclad, he got some pretty heavy nerfs, losing some incredibly strong cards to the void. If you previously enjoyed playing high-strength lifesteal Ironclad, well, I’m sorry to say, but those cards are no more. Flex, Heavy Blade, Limit Break, and Reaper all bit the dust, crushing part of what made Ironclad well… Ironclad.

So where does that leave us? Well, certain archetypes have been given more support, and I want to show you one of the most powerful decks out there right now. Get ready to sacrifice yourself to obtain some real power.
Build Overview

This build focuses on sacrificing your own HP for great rewards over the course of each fight. Some of these cards existed in Slay The Spire 1, but the deck was a bit hit-or-miss. Now with new support, this theme can support multiple variants of itself and carry you way into the higher Ascension levels very consistently.
As with every other character build I talk about, this isn’t necessarily the strongest possible deck you can play. With the right luck and combinations, you can get ridiculously powerful combos and infinites. However, the more important thing I’m focusing on today is consistency.
How often can you pull this kind of deck off and be consistently successful? Well, that’s far more important than constructing an entertaining meme build. This sacrificial deck only needs a few key cards to start spiralling out of control. So let’s take a look at some of these important pieces of the puzzle.
Key Cards
The most important cards for this build are commons and uncommons, meaning you’ll almost certainly see at least a couple of them every single run. That’s what makes this so consistent. We will also utilise some rares if we can get our hands on them, but that’s just the cherry on top. Cards you’ll want to look out for are as follows:
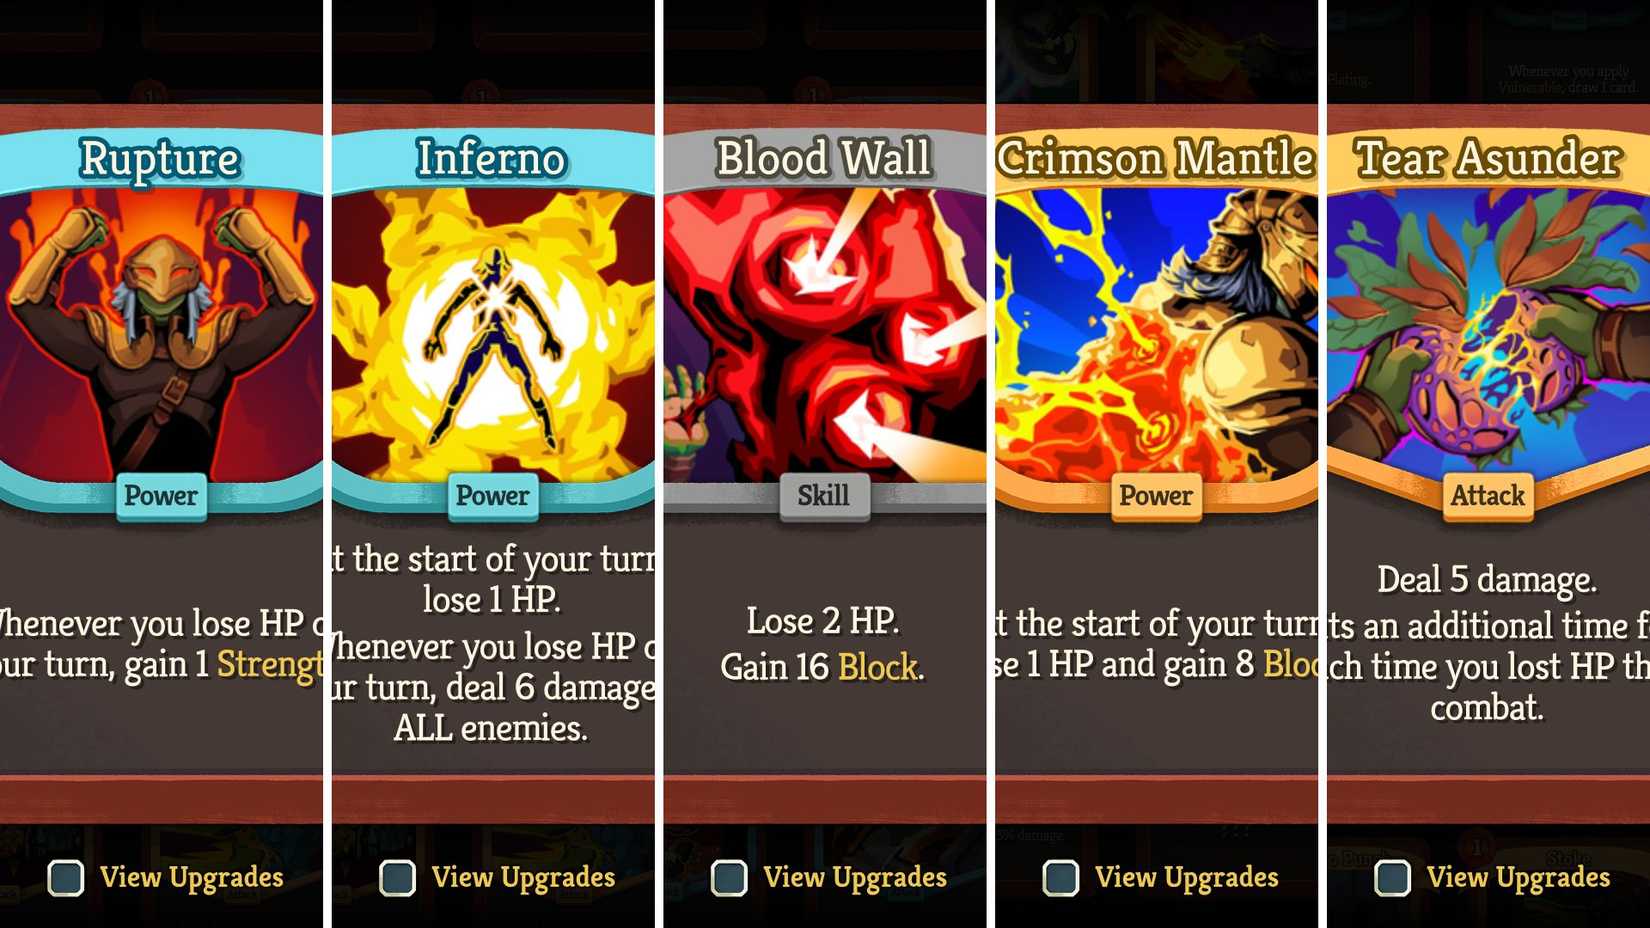
- Breakthrough (Common): Great early AoE card that deals good damage and drains 1 HP.
- Bloodletting (Common): Gain 2/3 energy at the cost of 3HP. Oftentimes, this is worth it simply to play another Defend. However, late in the game, this will extend your turn and allow huge plays.
- Blood Wall (Common): This gives you a huge amount of defence for only 2 energy and 2HP. This will save your skin as you're ramping over the course of the fight.
- Inferno (Uncommon): Every single time you lose HP on your turn, this will cause an AoE explosion to your enemies. It also triggers itself at the start of every turn.
- Rupture (Uncommon): Rupture is your main damage scaling in long fights. Every time you take damage on your turn, you’ll gain 1 strength. However, this doubles when upgraded, so that’s a must! Paired with Inferno, this is basically a free Demon Form.
- Crimson Mantle (Rare): This is ridiculously good when played early on. You simply need to sacrifice 1 HP every turn for 8-10 free Block. This procs your Rupture, while protecting your health from enemies.
- Tear Asunder (Rare): There’s no reason not to grab this when you see it. This does damage to your enemy based on the number of times you’ve been damaged in this combat (including by your enemies). Because you’re going to be self-damaging so often, this builds up ridiculously quickly, leading to massive amounts of burst damage.
Of course, there are more great cards to pick up, like Brand, Offering, Spite, and cards that inflict Vulnerable, but this is the crux of the main package.
Deck Specifics
Key Pointers
So, how are we going to be playing this deck? Well, a lot of the strength behind this deck relies on getting those core Power cards off pretty early on. As soon as you have Inferno and Rupture in play, you’re good to go. Not only is this great if the combat lasts a good amount of time, but it’s also fantastic against multiple enemies with small health pools.
You can purposefully activate self-damaging cards, even if they don’t benefit you, simply to get off a burst of inferno if you’re facing something like the Elite Worms in Act 1, or the Biting Books in Act 3.
Related
More often than not, taking damage from your own cards will save you from taking more damage from enemies in the long run, so don’t be afraid of taking damage to protect yourself.
This deck does struggle occasionally if you brick on the first turn, so it’s important to run a good amount of draw to supplement your strategy. Pommel Strike, Battle Trance, Drum of Battle, and Offering are, of course, great for this. You probably won’t be suffering too much for energy, as long as you run a couple of copies of Bloodletting. This will allow you those huge first turns.
Look out for cards that scale over time. Colorless cards like Rolling Boulder can win you the run if you can stall for long enough.
Defensive Focus

There are a couple of ways to build this sacrifice deck, depending on what cards you run into throughout the course of the run. The one that’s carried me into the high Ascension levels is the Defensive version, which runs a lot of blocking cards and fewer attacks.
You will still use Rupture and Inferno to build Strength, but here we try to get rid of as many strikes as possible. This thins our deck, allowing us to survive for longer and then wipe out the enemy when we have enough strength.
In this version, you can pick up cards like Body Slam, Iron Wave, Grapple, Impervious, Unmovable, and Barricade so you’ll last for longer. If you pair these cards with relics that give you a bit of Dexterity and relics that give you inherent block, you’ll be able to block pretty much all incoming damage easily. Blood Wall is particularly great for stalling.
As soon as you can, upgrade Body Slam so it costs 0 energy. It’s a pretty bad card if you can’t play it for free.
This means the only damage you’re likely to take is the damage you deal to yourself. And much of this self-damage can be mitigated by your starting relic, or its upgraded version.
Aggressive Focus
You won’t always be offered these highly defensive cards, though, so if necessary, you can go for a more aggressive option. There are a couple of ways to go about this; however, they’re pretty dangerous.
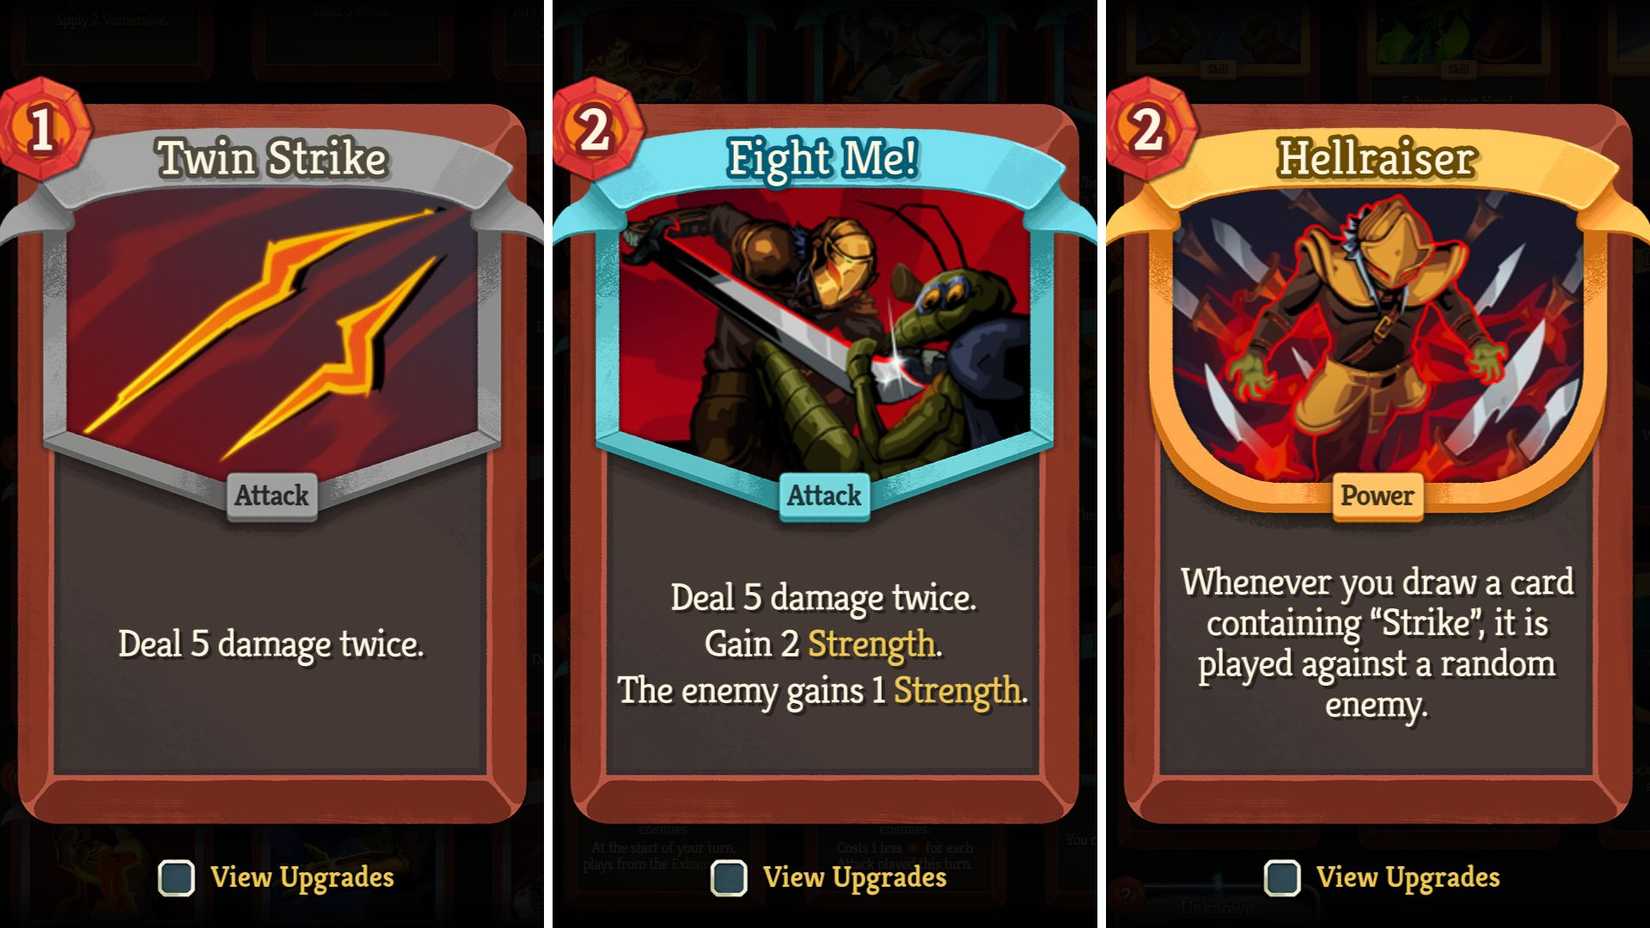
Your most likely option is the Strike variant. Here, we want cards like Set-up Strike, Twin Strikes, Perfected Strike, Fight Me, One-Two Punch, and Hellraiser. This is all about wiping the enemy out before they can touch you. Paired with the Strength bonus from Rupture, you can deal a huge amount of damage to your foes in the first couple of turns, especially when paired with relics like Red Skull, Strike Dummy and Brimstone.
The problem with this deck is that you’re going to be taking way more damage, so you’ll need to supplement your HP loss with Relics like Meat on the Bone, Ornamental Fan, or a selection of potions. This deck can be amazing, but it's not as reliable as the defensive version, so beware.
Blessings from the Ancients

Certain blessings can really make this deck shine in the right circumstances, but you’ll really just have to keep your fingers crossed here.
In terms of Neow, you can never really go wrong with cutting a few cards from your deck. If you plan on running a defensive build, you might want to cut out or even transform some of the Strikes in the hope that you’ll get something good.

Related
However, if you’re more aggressive, you can’t go wrong with more HP or even the Stone Humidifier, which is great over a long period of time.
Next up: Act 2. Here are some strong choices to pick:
- Orobas: Touch of Orobas is great here, upgrading your starting relic and doubling its power. Doesn’t matter which build you run; this will always be great.
- Pael: Pael can be a bit of a difficult one. Generally, you can’t go wrong with relics that give you more energy. Pael’s legion is also fantastic if you rely heavily on block cards.
- Tezcatara: Whenever you get the chance to add Brightest Flame into your deck, it’s almost always worth it, especially if you have something like Chosen Cheese to offset the downside. However, Golden Compass and Cocoa can also be great under the right circumstances.
In Act 3, we have more broken options that can often win you the run by themselves:
- Nonupeipe: Looming Fruit can be great if you’re struggling to stay alive, giving you higher Max HP and better healing from Rest Sites. Apotheosis is also amazing, but generally, if you’re already doing well. Diamond Diadem can also be clutch in a slow defence deck.
- Tanx: Tanx is generally better for more aggressive decks. However, Throwing Axe and Tri-Boomerang are always powerful, no matter the variant.
- Vakuu: Jewelled Mask pretty much guarantees that you start wth one of your crucial Power cards. Sere Talon can also guarantee you get what you need, depending on your circumstances. In addition, it can never hurt to have some Apparitions in your deck, giving you some extra time to find the cards you need, so don’t be afraid to grab Distinguished Cape.
While these are some of the more powerful options that you can take, naturally, as always with Slay The Spire 2, your choices will vary based on how your deck looks.
Don’t think too far ahead, and always plan for the next battle. While it can be tempting to plan for what you think your deck is going to look like in Act 3, if you die before, then the choice will have been for nought.

Next
Systems

Released March 5, 2026
ESRB e
Multiplayer Online Co-Op


![ELDEN RING NIGHTREIGN: Deluxe Edition [FitGirl Repack]](https://i5.imageban.ru/out/2025/05/30/c2e3dcd3fc13fa43f3e4306eeea33a6f.jpg)
 English (US) ·