.png)
.png) 1 hour ago
2
1 hour ago
2


Published Jun 30, 2026, 3:12 PM EDT
Laurence Wall is a Contributor at DualShockers who has been writing professionally since 2022 and covering games since 2023. He primarily writes guides and lists, with a focus on indie games, RPGs, ARPGs, Soulslikes, MMOs, card games, boss fights, and detailed tutorials.
Before joining DualShockers, Laurence worked as a game reviewer for Movies, Games and Tech. He also co-founded and served as a contributor liaison for a university creative writing magazine, where he was one of the publication’s principal contributors. Laurence holds a B.A. in English Literature and Creative Writing from Royal Holloway, University of London.
As you progress through the Flower world in Chapter 5 of Deltarune, you’ll come across plenty of tricky puzzles, many of which seriously require you to put your thinking cap on. And of course, while some of these puzzles may be skipped until a later date, if you want to get everything out of this chapter, you’re going to have to return at some point.
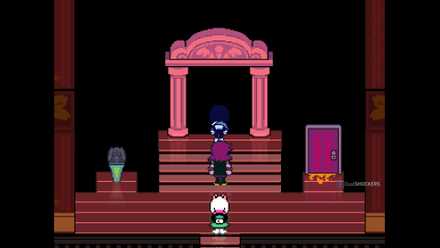
The Mysterious Puzzle, known to some as the Block Puzzle, can be found the first time you enter the Castle in the latter half of Chapter 5. These puzzles require you to switch between 2 perspectives and use special blocks in order to climb the rooms and obtain the objects hanging from the ceiling.
 Related
While these puzzles might seem pretty simple at first glance, the perspective-switching and translucent-screen shenanigans make them a little trickier than usual. There are 2 of these puzzles in Chapter 5, so let’s take a look at how we can find them and how to figure them out.
The Mysterious Puzzle Problem

So just how do these puzzles actually work? Well, you’re given a little board with which you can rearrange 2 blocks hidden behind the translucent white screens. These blocks need to be arranged in such a way that they allow you to climb up and reach the top.
Of course, with you not being able to jump in your regular form, you’ll need to activate one of the 2-D statues to change the perspective. In addition, you can only jump 3 blocks high, so you’ll need to take this into account when sorting the blocks.
Furthermore, the second puzzle will require you to work with Ralsei and Susie, using their 2D abilities to pull down screens to activate and deactivate blocks, and keep moving. It sounds pretty complicated on paper, but in practice, it makes a lot more sense.
Mysterious Puzzle #1

The first puzzle can be found by heading to the Mysterious Puzzle fast-travel door, or if this hasn’t been unlocked, by heading east from the main Castle Foyer. Keep going east past the Café and the next 2 rooms. The puzzle lies in the easternmost chamber.
When you reach the puzzle, arrange the blocks in the pattern shown above, so that the long vertical block forms an L-shape. Put the 2nd horizontal block on the top right, giving you a platform to jump across.
Head into side-scrolling mode, and jump up the L-shape, to the western ledge, then jump across to the East, where you’ll find a Pink Coin.
Mysterious Puzzle #2

The next puzzle is far trickier than the 1st. Either continue through the orange door, making it past the fists, or return to the café and head north into the Fox room. Keep going north until you get to the room with the statue and the spinning blade. Activate the statue, and then go left into the next room, where you’ll find the next puzzle.
It seems this puzzle has a couple of solutions; however, I solved it this way. First off, place the blocks as shown in the image above: the smaller block as a platform on the left, the larger block covering the right half of the top screen and the top half of the right screen.
Now, activate 2-d mode, and then use Ralsei to pull the screen down. Jump on Ralsei, and then jump to the left. Now deactivate Ralsei with Susie, then jump across to the right. Once more, use Ralsei to pull the screen down, and you’ll be able to use these new blocks to jump all the way to the top. Here you’ll find another Pink Coin!
 Next
Next

Systems
![]()

Released October 31, 2018
ESRB Teen / Language, Suggestive Themes, Mild Blood, Fantasy Violence
Engine gamemaker
Prequel(s) Undertale
Number of Players Single-player


![ELDEN RING NIGHTREIGN: Deluxe Edition [FitGirl Repack]](https://i5.imageban.ru/out/2025/05/30/c2e3dcd3fc13fa43f3e4306eeea33a6f.jpg)

 English (US) ·