.png)
.png) 3 months ago
30
3 months ago
30


Published Apr 12, 2026, 5:34 PM EDT
Jaime Tugayev is the News Editor for DualShockers with over a decade of experience, and a much longer love for fantasy, shooters and strategy games.
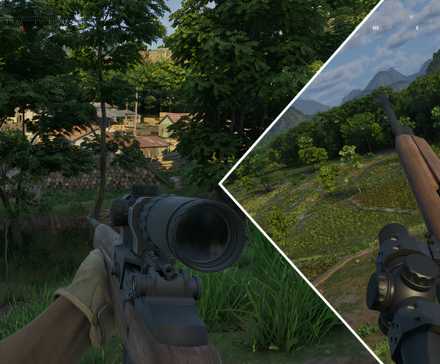
No trader in Gray Zone Warfare loves giving you dodgy assignments like Turncoat, but In the Trenches is intense even by his impeccable standards.
In order to stay one step ahead of the Lamang Liberation Army (LLA), Turncoat needs you to waltz into a fortified camp protected by a ring of trenches, observation towers, and dugouts. While fending off an entire garrison, you also need to scour the area for bits of intel to report
In the Trenches can be a frustrating task because of how easy it is to get your noggin ventilated by 5.56x45mm if you aren't familiar with the dangers of fighting in trenches.
Because of that, this walkthrough packs a guide on the bare essentials of how to assault trenches, including the gear you need to bring, and step-by-step instructions on how to complete the In the Trenches task in Gray Zone Warfare.
In the Trenches will reset upon death, after which you will need to wait for a long cooldown in order to restart the mission. If you feel out of your element halfway through, it's better to withdraw and then complete it later than die and lose all your progress.
In the Trenches Preparations

The humble trench has been a feature of wars for as long as armies have fought, but it became ubiquitous after the role it played in the First World War.
Trench warfare is brutal, unforgiving, and moves at a much slower pace than the usual room clearing because the margin of error is ever so small.
Getting through In the Trenches successfully starts by bringing the right kit. The mission area is defended by a large contingent of Lamang Liberation Army guerrillas, equipped with M16A1 and M14 rifles with M855 and M80 rounds, respectively. These will comfortably punch through light armor and helmets. If you have armor rated at NIJ III+, now is the time to bring them in.

Related
Gray Zone Warfare: Unlisted Flight Quest Guide
A Boeing 737 has come down in Lamang, and Lab Rat needs to find out why.
Additionally, some LLA soldiers have level IIIA and III body armor, so unless you have access to 4.6x30mm AP rounds for the MP7, leave the submachine guns at home. At the same time, due to the sheer volume of lead, shotguns remain viable, especially with FliteControl buckshot.
In terms of equipment, you'll want to either use irons or unmagnified optics, as things get pretty intimate in the trenches. Shorter barrel lengths will prevent snagging the barrel in tighter sections. To that effect, you can leave the suppressor at home, as the amount of gunfire this quest generates makes stealth basically impossible. I learned that the hard way, and lost a fully kitted out M4 with an LPVO and a suppressor for no good reason while attempting this.
M855 rounds are abundant in the quest area, so I recommend bringing an M4 or M16A1 in carbine length to avoid running out of ammo. Bring at least three frag grenades or flashbangs as well, and ideally a sidearm for when your primary goes dry, and someone is staring you in the eye.
In the Trenches Quest Walkthrough

Your mission objectives for the In the Trenches task are to read and pass on three pieces of intel to Turncoat. Two of these documents are located on the western hemisphere of the LLA camp, while the final one is inside the shack acting as a command hut.
It is possible to complete this quest without having to clear the eastern side of the camp, but because of how interconnected everything is, enemies are likely to move around toward the fighting even if you stick to the western side.
Your main task when assaulting a trench network like this is to get in. You're a sitting duck for as long as you're outside, so throw a grenade and then rush to jump into the trenches as soon as you can.
Next
Gray Zone Warfare: I Went, I Saw, I Conquered Quest Guide
The Sawmill northwest of Fort Narith has a lot more than just sawdust.
The two easiest points of access are by the northwestern and southwestern guard towers, which are also coincidentally where you need to be to complete your objectives. Because these are extremities, you don't have to worry about taking fire from more than one direction. Expect one enemy in the tower, and one or two in the trench right beneath it.

Some trench sections are extremely shallow and don't offer you cover even when crouching, so unless you like getting hit in the head, go prone. It takes an extra 20 seconds to cover that ground, while you will lose your entire quest progress if you die.
LLA Operational Note

The LLA Operational Note document is located on a desk by the northwestern watchtower, between a crate with empty water bottles and a radio.
Clear the two or three enemies there, then approach it to collect the intel and report to Turncoat.
LLA Strategic Directive

The next document is also located on a desk, this time in the southwestern corner of the camp, typically with two enemies guarding it.
Stay in the trenches while picking up both the first and second documents. Enemies in the central part will sometimes leave cover to attack you, but you are in a much better position to return fire while dug in.
LLA Internal Comms

The final piece of the puzzle is located at the dead center of the camp, conveniently. This is the easiest item to find, but reaching it is a little complicated due to the camp's layout.
The center of the camp has three different exits to the trenches, on the northern, western, and eastern sides. These make for excellent kill zones for the four to five LLA soldiers holed up in there.
Additionally, there is open ground between the safety of the trenches and the protected camp center, so it only takes one opportunistic enemy you forgot about to ruin your day.
The western approach offers the most protection, but has very limited visibility into the central area. Still, this allows you to attack the objective without having to fully clear out the eastern side of the camp.
Lob grenades into the area to thin out the defenders, then push hard to finish them off. You'll need to act quickly, as they will likely all open up with automatic fire the second you leave cover.
Once you're in the clear, enter the big shack and look for the small piece of paper on the two crates, next to the gallon of water and the empty cardboard boxes. Inspect it to report it and complete the In the Trenches quest in Gray Zone Warfare.

Next
Gray Zone Warfare: Street Spotter Quest Guide
Gunny needs to find an old friend, and that is somehow your problem.

Systems

Released April 30, 2024
ESRB m
Developer(s) Madfinger Games
Publisher(s) Madfinger Games
Engine Unreal Engine 5


![ELDEN RING NIGHTREIGN: Deluxe Edition [FitGirl Repack]](https://i5.imageban.ru/out/2025/05/30/c2e3dcd3fc13fa43f3e4306eeea33a6f.jpg)
 English (US) ·