.png)
The "Great Taste of Pharloom" quest is one of the most intimidating quests in Hollow Knight: Silksong. This is especially true for the timed delivery objective, which requires the optimal Courier's Rasher route through the Silksong map. If you keep smashing the Rasher, or haven't found Pharloom delicacies like the Crustnut or Pickled Muckmaggot yet, we'll find a way to make this insanely difficult Silksong quest a little less insane.
Here's how to find every Pharloom delicacy required to complete the "Great Taste of Pharloom" quest in Hollow Knight: Silksong.
'Great Taste of Pharloom' quest location in Hollow Knight: Silksong
Once you reach the Choral Chambers during Hollow Knight: Silksong Act 2, speak with an NPC called Loyal Mergwin to begin the “Great Taste of Pharloom” quest. You will find Loyal Mergwin west of Songclave (First Shrine) and the Cogwork Core.
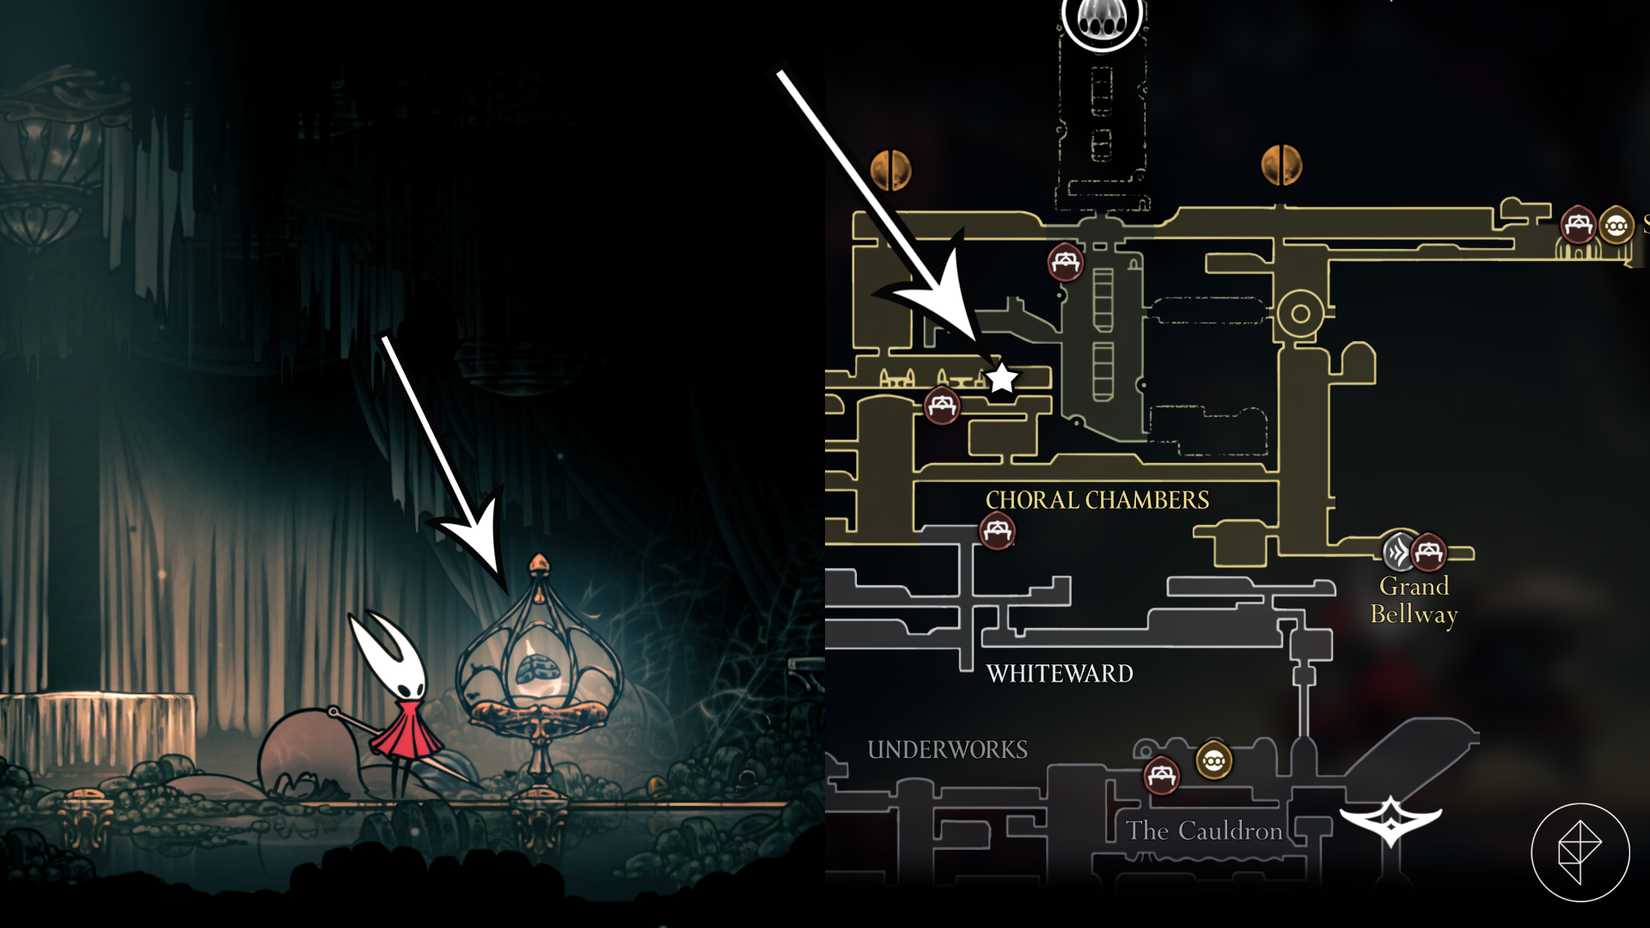 Graphic: Marloes Valentina Stella/Polygon | Source images: Team Cherry via Polygon
Starting from Songclave, take the upper road towards the west and defeat the Cogwork Dancers in the middle of the Cogwork Core (on the same level as Songclave). Continue west until you’re able to drop down, then keep descending until you reach the eerie dining hall. Here, walk right until you see a strange orb in a glass display. Hit it to trigger Loyal Mergwin’s appearance.
'Great Taste of Pharloom' quest walkthrough in Hollow Knight: Silksong
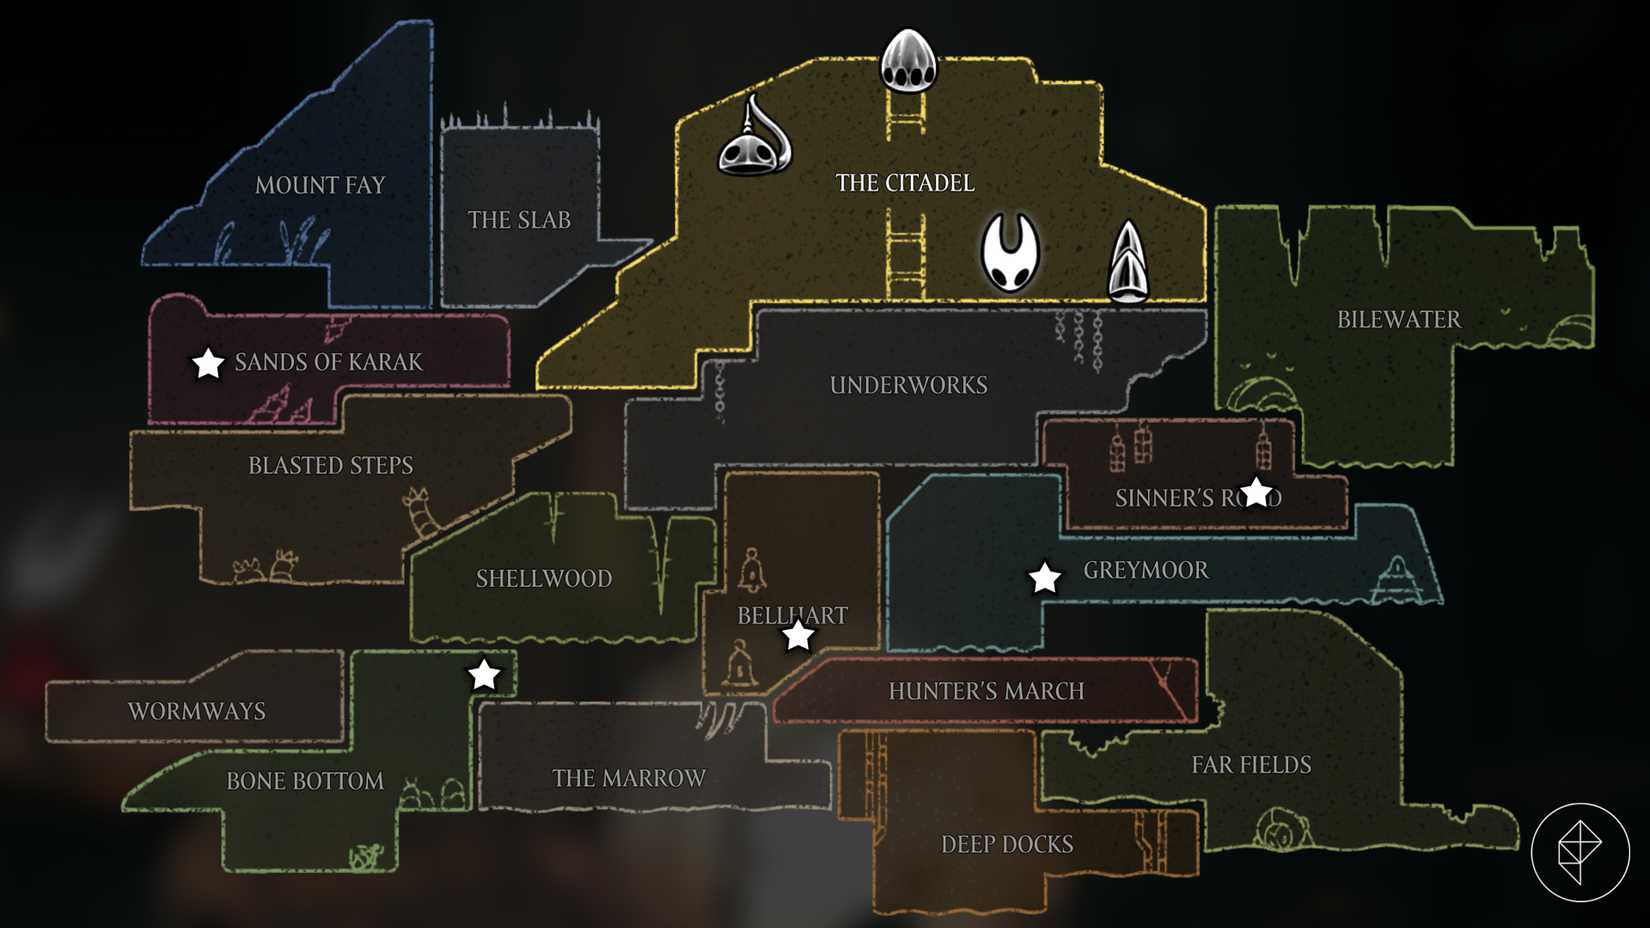
To complete the “Great Taste of Pharloom” quest, you must collect five rare delicacies of Pharloom. Here’s an overview of all delicacy locations, so you’ll have a general idea of where to look for them:
 Graphic: Marloes Valentina Stella/Polygon | Source images: Team Cherry via Polygon
- Mossberry Stew: Given by Moss Druid in Bone Bottom.
- Vintage Nectar: Sold at the Halfway Home inn in Greymoor.
- Courier’s Rasher: Obtained in Bellhart, must be delivered to Loyal Mergwin without fast travel.
- Crustnut: Found in the Sands of Karak region following a tricky parkour path.
- Pickled Muckmaggot: Dropped by the Disgraced Chef Lugoli boss in Sinner's Road.
Beware that some of these locations require specific abilities, including the Drifter's Cloak, Needolin, Clawline, Cling Grip, Swift Step, and Faydown Cloak. It's best to pick them up first!
Check out the sections below to learn more about every "Great Taste of Pharloom" delicacy location in more detail.
Mossberry Stew location
To obtain Mossberry Stew, speak with the Moss Druid in the eastern part of Mosshome. Fast travel to the Bellway station in The Marrow, then move left and use the platforms in the room with the corrupted pilgrims to reach the higher area. From here, take the lower path to the right. If you haven’t done so already, you must use the Silkspear ability to remove the silk strands blocking the way.
If you’ve already completed the “Berry Picking” quest, you simply need to speak with Moss Druid and they’ll give you the Mossberry Stew.
 Graphic: Marloes Valentina Stella/Polygon | Source images: Team Cherry via Polygon
If not, Moss Druid will likely ask you to bring them three Mossberries first. The Mossberries are found in a room below Moss Druid, at the top of Moss Grotto, and at the top of the large chamber below Bone Bottom. Our "Berry Picking" quest guide will show you where to find the three Mossberries in more detail.
Vintage Nectar location in Hollow Knight: Silksong
You can purchase Vintage Nectar in Greymoor’s Halfway Home inn for 480 rosaries. Starting from the Greymoor Bellway station, jump up and move right to get there. Speak with Creige to make the purchase.
 Graphic: Marloes Valentina Stella/Polygon | Source images: Team Cherry via Polygon
Unfortunately, Creige will then send you down into his ant-infested cellar below the Halfway Home to collect the Vintage Nectar for yourself. It’s highly recommended to rest at the Halfway Home bench first!
Drop down to the bottom of the cellar and interact with the item lying on the ground. This will spawn a bunch of ant enemies, whom you need to defeat. Once you’ve defeated the last one, a second wave of ants will spawn. Be wary of the big Skarrgard mini-boss in particular; you might want to steer clear of them until you’ve killed the smaller enemies.
 Graphic: Marloes Valentina Stella/Polygon | Source images: Team Cherry via Polygon
Once they’re all defeated, try grabbing the Vintage Nectar from the bottom of the cellar again — this time, you won’t get jumped by ants.
Crustnut location in Hollow Knight: Silksong
The Crustnut lies hidden in the Sands of Karak region, north of the Blasted Steps.
 Graphic: Marloes Valentina Stella/Polygon | Source images: Team Cherry via Polygon
Although the previous two "Great Taste of Pharloom" locations didn't require them, it’s best to get the following abilities and items before attempting to reach the Crustnut's location:
- Clawline: This is essential. Find it in The Cauldron, at the heart of the region below the Choral Chambers and Whiteward.
- Faydown Cloak: Unlocks double jump. It doesn't seem absolutely essential to reach the Crustnut, but it will make the parkour sections far easier. It lies at the top of Mount Fay, the northwest part of Pharloom.
- Ascendant's Grip: A Crest Tool sold for 350 rosaries by Jubilana in Songclave (First Shrine). You must complete “The Wandering Merchant” quest to unlock this merchant.
If you’ve already unlocked the Blasted Steps Bellway station, you may start from there. If not, start from the Shellwood Bellway station and walk to the left. Use the Cling Grip (wall jump ability) to jump up at the first opportunity.
Keep following the path, leading further upwards and then to the right, by jumping across the hanging platforms. You can pogo (use downwards attack) across the hanging bells. Following this route, you’ll find Shakra the map vendor — best to get yourself a Blasted Steps map if you haven’t got one yet!
 Graphic: Marloes Valentina Stella/Polygon | Source images: Team Cherry via Polygon
Leave this area through the exit in the upper left corner. In the next area, leave through the exit at the top again. Turn left, and you’ll find the Blasted Steps Bellway station.
From the Blasted Steps Bellway (be sure to rest at the bench first), go right and drop down. Take the left exit in the middle of the area, marked with a blue flag.
 Graphic: Marloes Valentina Stella/Polygon | Source images: Team Cherry via Polygon
From there, just keep going left, into The Great Conchflies boss arena. These red-hatted fiends will aim their pointy hats before “drilling” in that direction, so be sure to avoid those attacks. After the boss fight, continue to the left and use your Clawline ability to move across the platforms. At the end of the path, you’ll find the Pinstress’s house (the big balloon).
 Graphic: Marloes Valentina Stella/Polygon | Source images: Team Cherry via Polygon
While you’re here anyway, be sure to have a chat with the Pinstress! If you agree to train with her, she’ll give you the Needle Strike ability (unlocks charged attacks).
To get closer to the Crustnut location, you must use the Clawline on the hanging rings. Leave this area in the top left to — finally — reach the Sands of Karak region.
Travel east; whenever you see a yellow orb, hit it to spawn a parkour line. When you arrive in the larger, mostly vertical room, take the exit above you to the left to find Shakra and purchase the Sands of Karak map.
 Graphic: Marloes Valentina Stella/Polygon | Source images: Team Cherry via Polygon
As you leave Shakra’s room, jump up and hit the red spike hanging from the ceiling. This will grant you a shortcut to the Blasted Steps Bellway station below.
After resting and making your way back to the area where you found Shakra, continue just a bit further upward. See the red cluster of spikes on your left? Hit them to break through the wall and reveal a hidden obstacle course to the Crustnut.
 Graphic: Marloes Valentina Stella/Polygon | Source images: Team Cherry via Polygon
In the parkour section that follows, you must continue to break these spiky clusters. Be careful not to touch them with anything other than your Needle! Try to remove the spikes with downward attacks as much as possible to avoid damage. Luckily, they don’t grow back when you respawn. At the end of the path, you’ll find the Crustnut.
Courier’s Rasher location in Hollow Knight: Silksong
Go to Bellhart’s quest board and complete two prerequisite quests: "My Missing Courier" and "My Missing Brother." Upon your next visit to Bellhart, the courier brothers Tipp and Pill will be sitting on a higher ledge above the quest board. Have a chat with them, and they’ll allow you to deliver the Courier’s Rasher to Loyal Mergwin.
 Graphic: Marloes Valentina Stella/Polygon | Source images: Team Cherry via Polygon
This task isn’t quite as simple as you might think, though, as fast travel is not allowed. On top of that, taking damage or running into things at full speed will diminish the Courier’s Rasher’s freshness. As soon as you’ve picked it up, an icon will appear below your health bar to show you the Rasher’s durability. If it runs out, you’ll have to start over. Even if you don't get hit, the Courier's Rasher's durability will diminish over time, but you've got a few minutes before it's depleted.
The Clawline grappling ability and the Faydown Cloak’s double-jump skill are incredibly useful to have. You might equip the Silkspeed Anklets (obtained from one of the Far Fields secret areas) and the Flea Brew (obtained by finding the first set of Lost Fleas) to improve your movement speed as well.
Before you try this route while carrying the Courier’s Rasher, it’s best to prep your run. Here are a few things you should do:
- Make sure the elevator directly left of the Halfway Home is down and ready for use. You can unlock it by climbing the cannon-shaped area further left.
- Break the breakable wall in the northwest corner of Sinner’s Road, leading to the misty area.
- Clear the mist in the northeastern part of Sinner’s Road.
- Enter the Exhaust Organ and defeat the Phantom boss.
- Make sure you’ve opened the hatches just left of Loyal Mergwin’s location (where you obtained the “Great Taste of Pharloom” quest), leading downward.
- If you're struggling to avoid attacks, you can clear the enemies on this route before picking up the Courier's Rasher. of course, avoid resting at a bench, as this will respawn the enemies.
Once that’s done, it’s time to give it a try! Here’s the fastest and easiest Courier’s Rasher route I’ve found. The first leg leads from Bellhart to the Exhaust Organ:
 Graphic: Marloes Valentina Stella/Polygon | Source images: Team Cherry via Polygon
- Starting from Bellhart, run east through Greymoor.
- When you reach Halfway Home, do not go inside — instead, take the lift up to Sinner’s Road.
- Continue east until you reach the bench sign at the bottom of a large vertical area (where the Green Prince was imprisoned). Leave this area at the top, then head towards the left.
- Pogo across the wheels, be ready to jump over the large enemy in the top left, and leave through the exit behind the breakable wall.
- Go west until you can go no further, then move up and east (passing through the area where you should’ve cleared the mist previously). Continue until you find the doorway to the Exhaust Organ.
The second part leads from the Exhaust Organ to Loyal Mergwin:
 Graphic: Marloes Valentina Stella/Polygon | Source images: Team Cherry via Polygon
- Jumping up the walls, follow the path to the Phantom’s arena. You can pass right through to the west.
- Keep following the path (only one way to go) past the Grand Bellway station.
- In the massive vertical room (Choral Chambers), take the second-lowest exit to the left.
- Continue west until you reach another large, vertical chamber. Cross this room and take the slightly higher exit to the left.
- You will enter a third vertical room, just southwest of Loyal Mergwin. Jump up until you reach the dining hall, which is behind the third-lowest exit on the right.
- Shortly after entering Loyal Mergwin’s chamber, use Cling Grip to jump up, then continue to the right.
Speak with Loyal Mergwin to complete your Courier’s Rasher run.
Although this route contains sections with few to no enemies, the downside is that it's fairly long. If you struggle with the time limit rather than enemy evasion, you may prefer an alternate Courier's Rasher route that leads west instead of east. Be sure to unlock the hidden paths from the Grand Gate to the Choral Chambers as well as the path directly above the Choral Chambers' Ventrica station before attempting this route.
The first leg of this route leads from Bellhart through Shellwood and the Blasted Steps:
 Graphic: Marloes Valentina Stella/Polygon | Source images: Team Cherry via Polygon
- Keep going left until you reach the westernmost chamber of the Shellwood, then jump up. Alternatively, you can use the elevator to skip some of the white flower sections, but beware that it's more time-consuming. It's also possible to move upward through the central vertical chamber, leading you to the Shellwood Bellway station, but this route contains many annoying enemies on top of thorns and white flowers, so the western chamber may be easier.
- Move west through the Blasted Steps region. At the first opportunity, make your way up.
- From here, keep moving in the northeast direction. When you reach the massive vertical chamber with the red-beaked airborne enemies, be sure to go upward (exit in the northeast) instead of directly to the right (dead end).
- Continue northeast to enter the Grand Gate.
The second part of this Courier's Rasher route leads from the Grand Gate to the Choral Chambers, taking the path through the Citadel Spa.
 Graphic: Marloes Valentina Stella/Polygon | Source images: Team Cherry via Polygon
- Cross the Grand Gate to the east, and jump upward across the chandelier platforms in the vertical chamber. Your goal is the upper balcony on the right side, which offers a hidden entrance to the Choral Chambers.
- In the Choral Chambers, move upward until you reach the Ventrica station. On the left side of that station, jump upward.
- Once you've reached the highest point above the Ventrica station, just continue east through the Citadel Spa, then keep moving northeast until you get to Loyal Mergwin.
Pickled Muckmaggot location in Hollow Knight: Silksong
This Pharloom delicacy is on the east side of the Sinner’s Road region, where you must kill the Disgraced Chef Lugoli boss to get it. Beware that you cannot reach the boss arena without the Faydown Cloak obtained from the top of Mount Fay.
 Graphic: Marloes Valentina Stella/Polygon | Source images: Team Cherry via Polygon
To reach the boss arena, fast travel to the Greymoor Bellway station, then take the northeast exit in the same area as the Halfway Home inn. Follow the path east until you see a bench sign, then jump up and take the first exit to the left.
 Graphic: Marloes Valentina Stella/Polygon | Source images: Team Cherry via Polygon
This will lead to the bench nearest to the boss arena. Beware that the bench is broken, but if you break the wall in the top left of this room and follow a short parkour path, you can hit the strings below the bench to fix it.
Once you’ve rested, drop down to the lowest level in Sinner’s Road again (where you saw the bench sign). Go right, then use double jump to enter the pipes and reach the boss arena. Be sure to unlock the door to the left before you start the fight (it’ll make the run from the bench to the boss much shorter).
 Graphic: Marloes Valentina Stella/Polygon | Source images: Team Cherry via Polygon
Hit the golden gong to start the battle. The first wave consists of two knife-wielding flies, but they aren’t the main boss, so try to save your items. Their only attack is a double downward knife slash — just avoid this attack and hit them right after.
 Graphic: Marloes Valentina Stella/Polygon | Source images: Team Cherry via Polygon
Once the two flies are down, Disgraced Chef Lugoli drops in. Lugoli uses body slams, downward slashes, and green goop to attack you. The green ball throws are probably the hardest to dodge as they fly upward in an arched pattern before coming down, whereas Lugoli’s direct attacks are mostly vertical.
The Cross Stitch skill might help if you’re having trouble dodging Lugoli’s attacks. Alternatively, you may find it easier to steer clear of Lugoli and rely on the horizontal Silkspear attack as much as possible. Upon defeat, Disgraced Chef Lugoli will drop the Pickled Muckmaggot.
'Great Taste of Pharloom' quest reward in Hollow Knight: Silksong
As a reward for completing “Great Taste of Pharloom," you’ll be given one stack of Pale Oil. Bring it to Pinmaster Plinney in Bellhart for a Needle upgrade. Beware that the first Needle upgrade from the Pinmaster is free, but if this is the second time you bring him Pale Oil, it’ll cost an additional 450 rosaries.
Correction (Sept. 22): A previous version of this guide mixed up the names of two locations (Blasted Sands instead of Blasted Steps).
Looking for more Silksong help? Check out our essential beginner tips and top rosary bead farming locations if you're just getting started, and if you're running up against a few locked doors, our simple key locations guide is the one for you.
While you're exploring and completing quests like the "Rite of the Pollip" wish or "Silver Bells" request, make sure to spend some time progressing the main story as well, as you'll get some upgrades that make battles easier. After "The Threadspun Town" quest, for instance, you can upgrade your needle to deal more damage.


![ELDEN RING NIGHTREIGN: Deluxe Edition [FitGirl Repack]](https://i5.imageban.ru/out/2025/05/30/c2e3dcd3fc13fa43f3e4306eeea33a6f.jpg)
 English (US) ·