.png)
.png) 1 month ago
21
1 month ago
21


Published Jun 2, 2026, 12:03 AM EDT
Tay Garcia is a Contributor at DualShockers and a Brazilian journalist who has been covering games professionally since 2017. Her work spans news, reviews, previews, lists, guides, and features, with a particular focus on horror, retro games, theories, puzzle games, Metroidvanias, Soulslikes, and story-driven titles.
Before joining DualShockers, Tay worked as an assistant editor and contributed to Jovem Nerd, one of Brazil’s largest pop culture outlets, as well as Editora Europa, a major Brazilian publisher known for gaming and technology magazines. She has also worked as a streamer, YouTube creator, and podcaster. Tay holds a B.A. in Journalism, has postgraduate training in Social Media, and is certified in professional video game journalism. She was also a member of Podcast UP, which won the Cubo de Ouro Award for Best Podcast in Brazil in 2021.
Sign in to your DualShockers account
The gothic world of Mina the Hollower is absolutely packed to the brim with little secrets, hidden pathways, different weapons, and valuable items to uncover. And among the most precious assets you can gather during your journey are Kears.
These unique items function essentially as ancient keys, allowing Mina to open locked doors, shatter obstructing blocks, or crack open sealed treasure chests scattered across both dungeons and the vast overworld.
In total, there are 50 Kears waiting to be found throughout the entire game. Because they are meticulously hidden in obscure corridors, tucked away in forgotten chests, or sold in limited quantities by merchants, tracking down every single one requires immense patience, sharp observation, and a relentless eye for environmental anomalies.
 Related
Luckily for you, we have already spent countless hours turning over every single stone and investigating every suspicious wall in Yacht Club Games' latest masterpiece, meaning that below is our complete guide detailing the exact locations and solutions for all Kears in the game.
Kear 1
Inside a Hidden Hole in Loner’s Landing
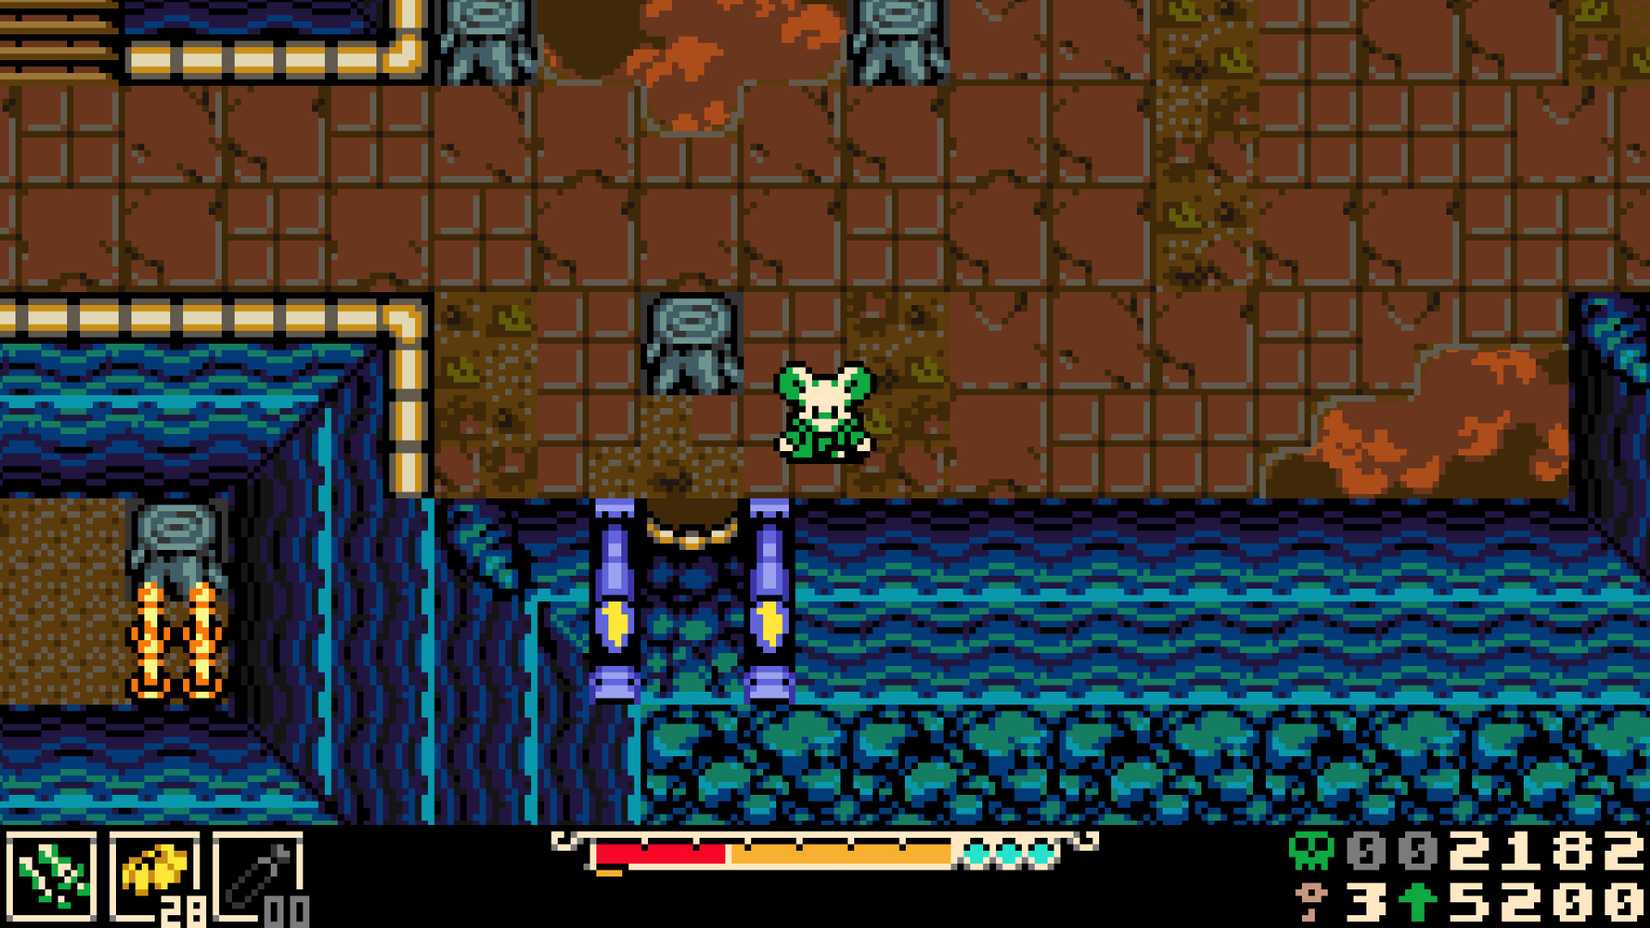
After surviving the initial shipwreck sequence, push forward through the main path until you arrive at an area with a bridge. You will need to head toward the back of the scenario to loop around the left side, crossing over this bridge to access a new screen directly to the right. In the next area, defeat all enemies along the trail until you notice a small tower with a cracked wooden door. Strike this broken entrance to trigger an explosion that clears the way, revealing a hidden hole in the floor. Drop straight down into the opening and follow the underground path to its end to claim your very first Kear.
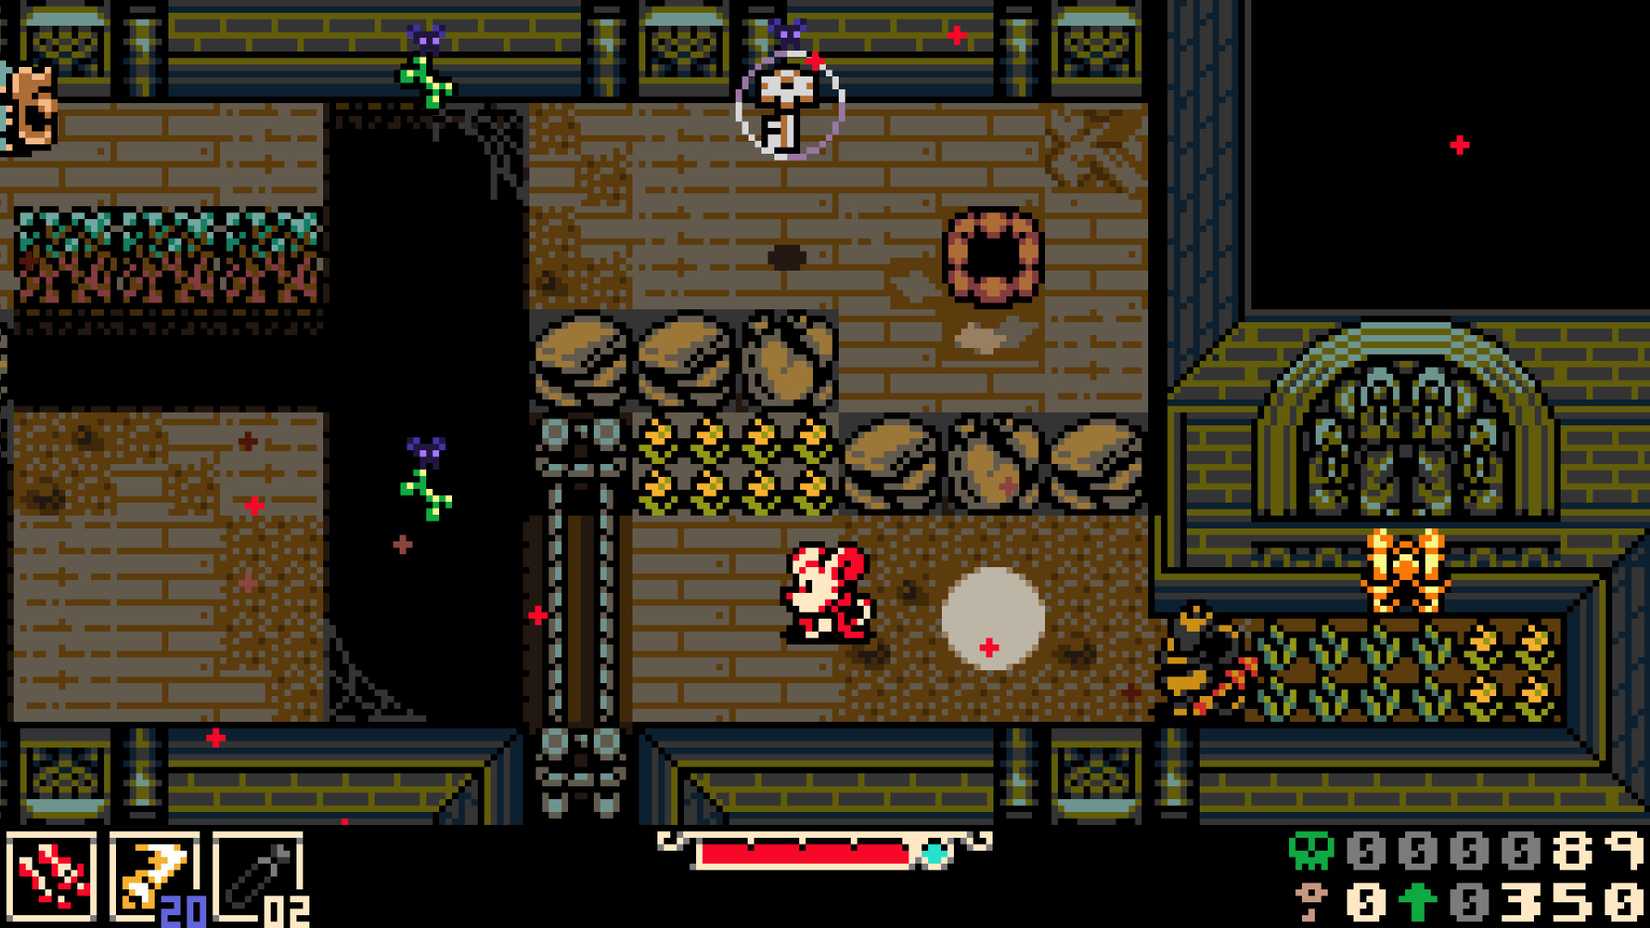
Kear 2
In a Fire Puzzle in Loner’s Landing
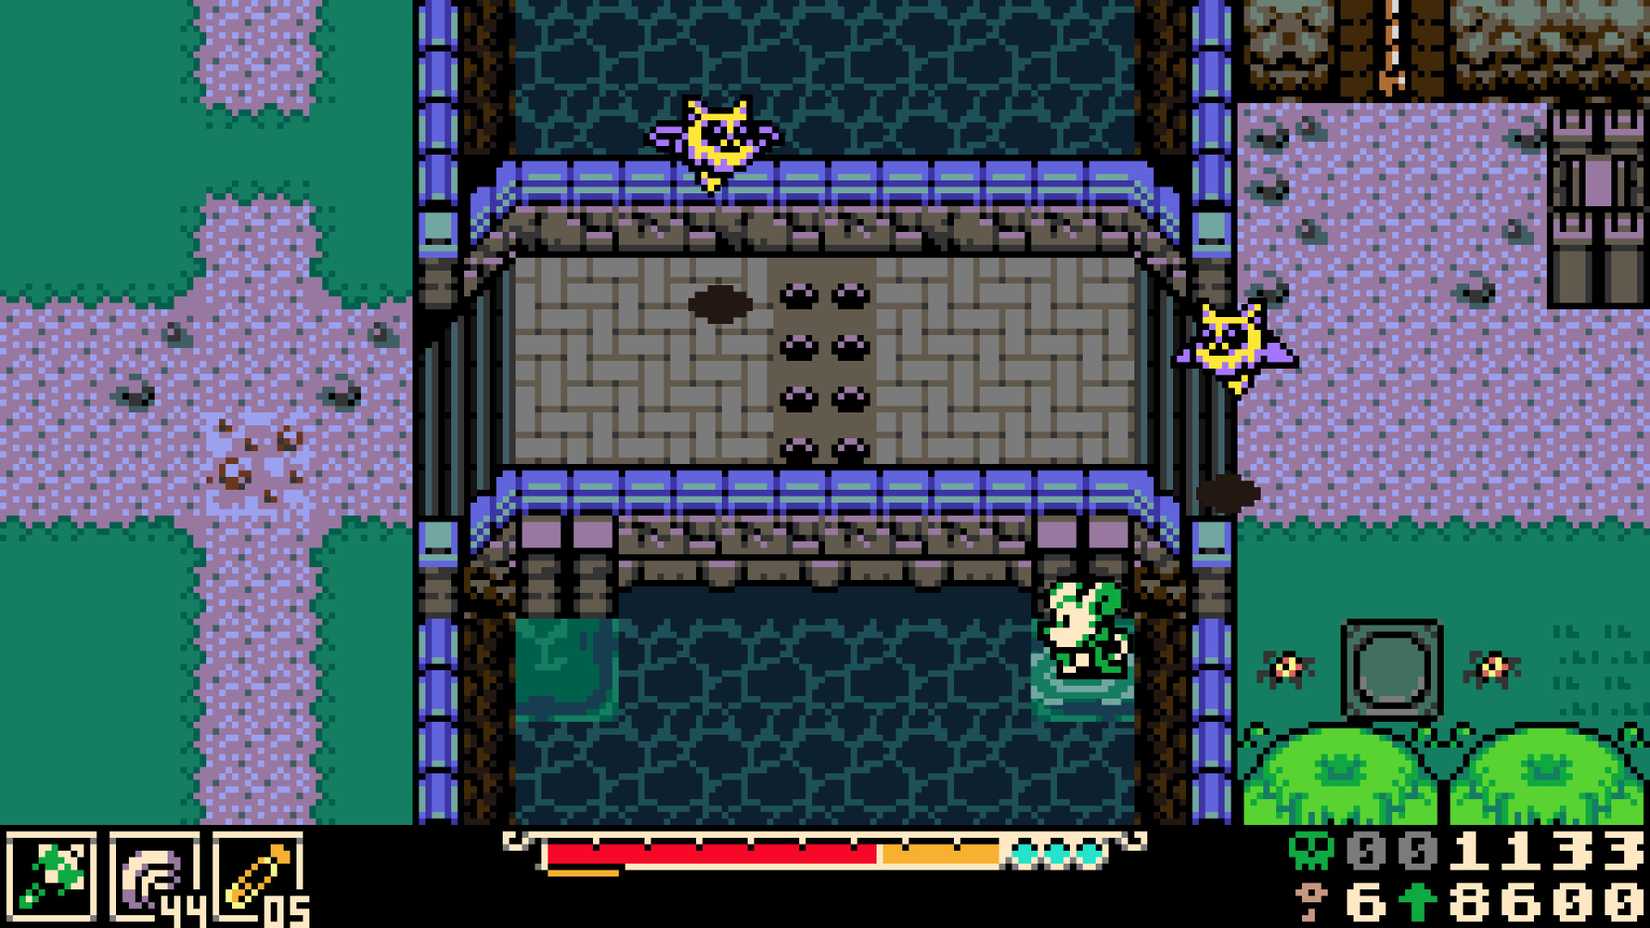
After pocketing your first Kear, continue pushing forward until you step into an arena surrounded by raging wildfires. Maintain your momentum until you locate two moving platforms floating across the screen, and notice that one of them glides directly in front of a high-jumping purple flower. Utilize this floral launchpad to boost yourself down into the bottom-right corner of the interface, landing inside a secret area. From there, use a few more purple flowers to launch yourself over to the platform on the left, where two enemies are guarding a lone treasure chest. Clear out the threats and crack open the chest to secure the second Kear.
Kears 3, 4, 5, 6, 7, 8, 9, 10, and 11
Buying from the Kear Institute, in Ossex
A chunk of your Kear collection can be purchased directly from a merchant named Kearnes inside the Kear Institute, in Ossex. You can easily recognize his establishment because it features an enormous replica of a Kear mounted right on top of the building’s roof, on the street right below the main fountain of the city. Once inside, you will find Kearnes sitting in a plush armchair on the right side of the room. Just be careful with your finances here, as his prices skyrocket with every transaction! Your first purchase will cost a reasonable 300 Bones, but the second item jumps immediately to 500 Bones, and they only get steeper from there. In total, he has 9 Kears for sale.
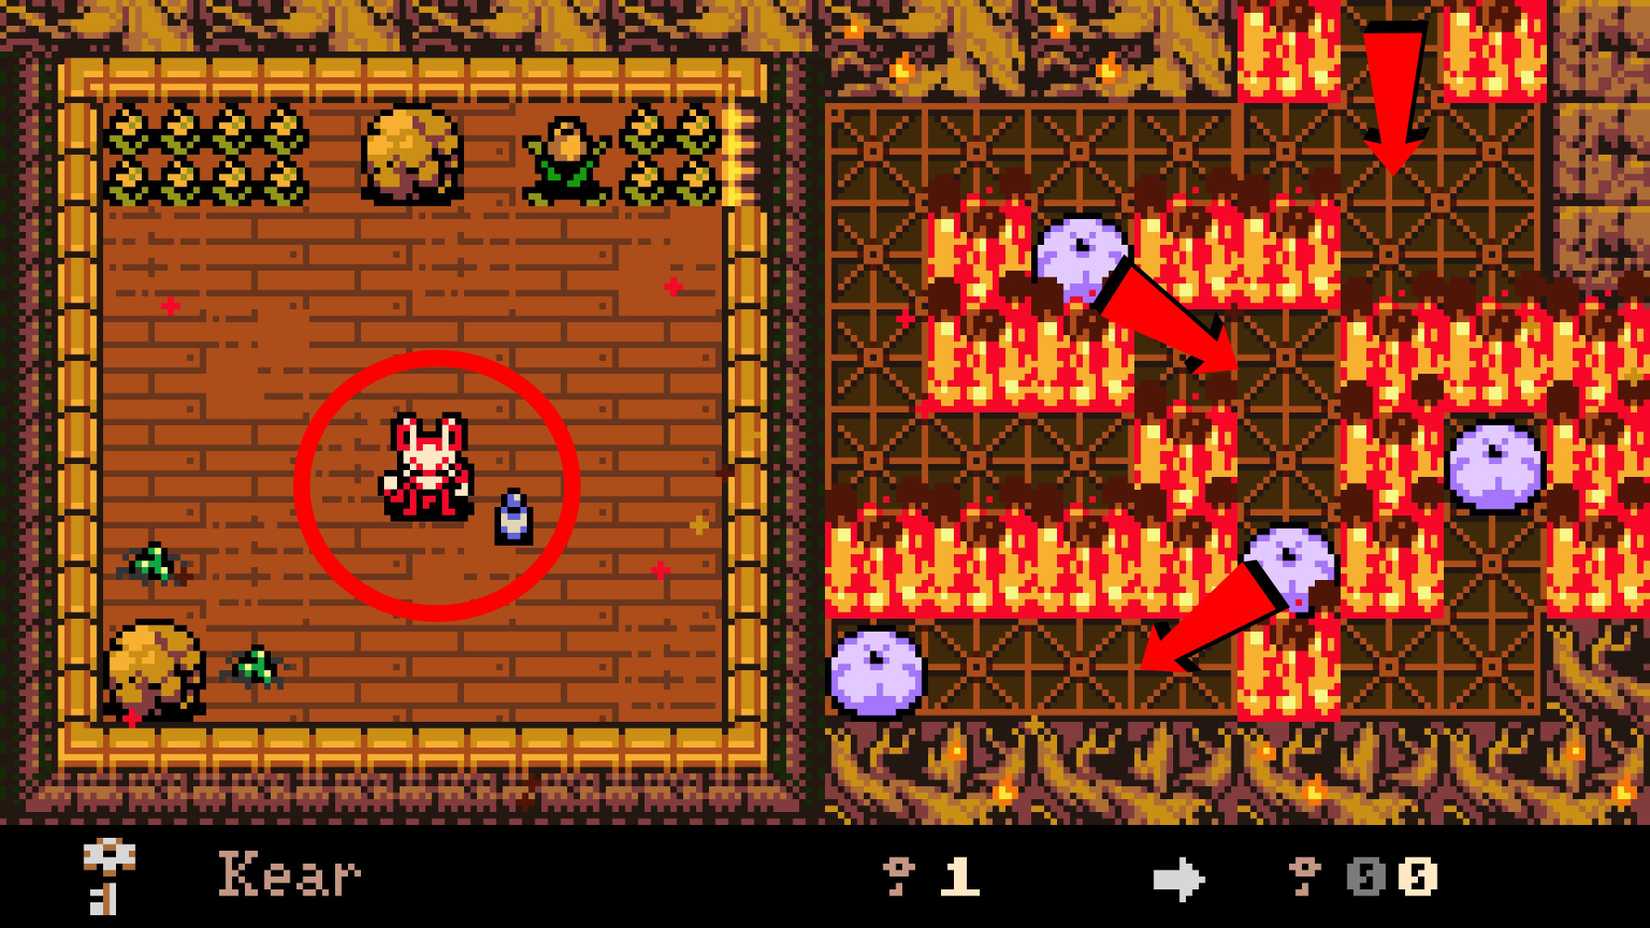
Kear 12
In the Hollower’s Guild in Ossex
Stand outside the front entrance of the Kear Institute and look downward to spot a regular wooden crate sitting in a suspicious corner. Smash the crate to uncover a hidden pathway lined with loose Bones to collect and a few platforming hazards to leap over. Navigate through this path to emerge right at the front of the Hollower’s Guild. Step inside the main hall and use the burrowing ability at the back of the room to enter a secret chamber. Pop open the treasure chest resting right alongside the NPC to claim your Kear.
Kear 13
In the Telescope in Ossex
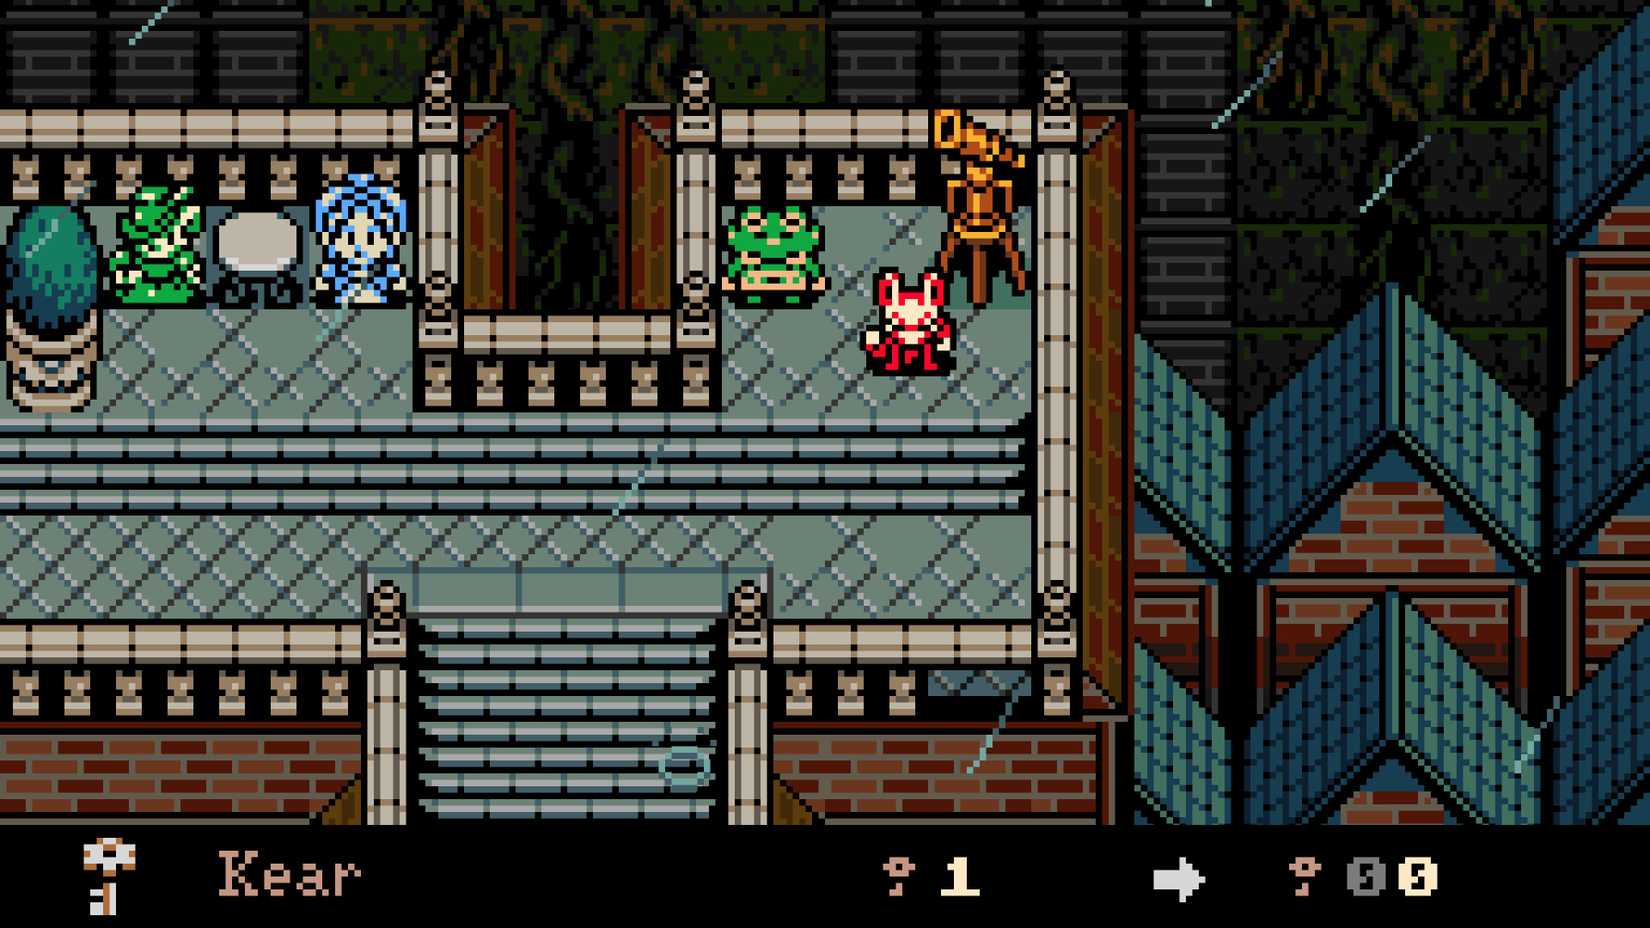
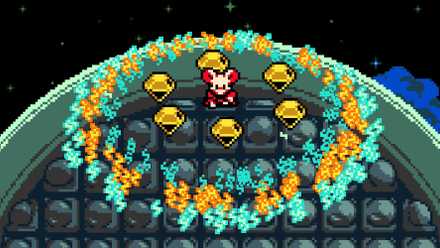
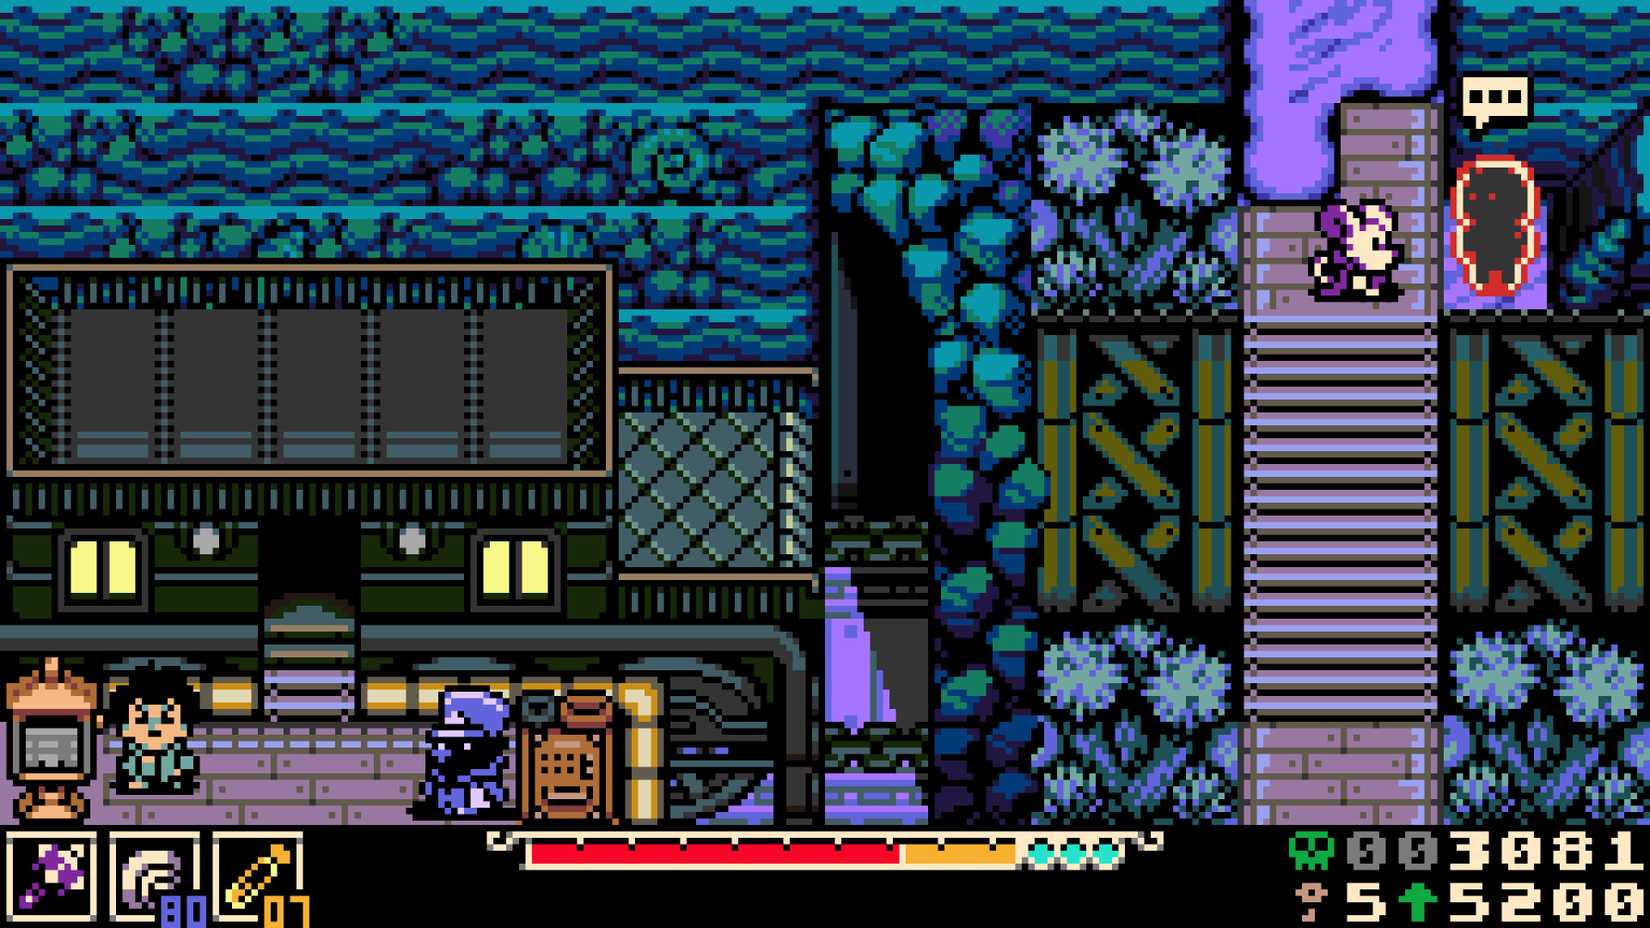
From the central square of Ossex, follow your right into the next screen. In this bustling neighborhood filled with hurried citizens, go up to find a path locked by a barrier – then use a Kear to open it. Climb the stairs, and you’ll find an NPC near a telescope. Before interacting with the device, speak with him, and he’ll mention that he just spotted something darting past a distant planet and asks you to take a look. Peer into the lens and steer the view completely to the right edge until it locks.
From there, pan upwards until you find a big yellow planet. Try looking around this celestial body carefully until a bright sparkle flashes on the screen (don’t worry if it doesn't appear immediately, just pan away for a moment and center back on the planet to try again). Triggering this sparkle causes a literal comet to crash directly onto Mina, leaving a Kear for her to grab.
Kear 14
Buying from Poppit in Eastern Heath
This one is locked behind Poppit’s first secret shop, hidden in Eastern Heath. To access this zone, exit through the right gate of Ossex and cross the bridge (if you haven't activated this shortcut yet, loop around using the lower valley path, conquering the platforming challenges and hitting the floor switch on the opposite side to lower the bridge).
In the next screen, where the road forks upward and eastward, dodge past two moving spike traps and head right, going into the lower screen this time. Now, drop all the way to the bottom edge while hugging the right wall to locate a hole in the floor. Use your burrowing ability to slip underground and squeeze through the gap to discover Poppit’s first shop, where he will sell you a Kear for 200 Bones.
Kear 15
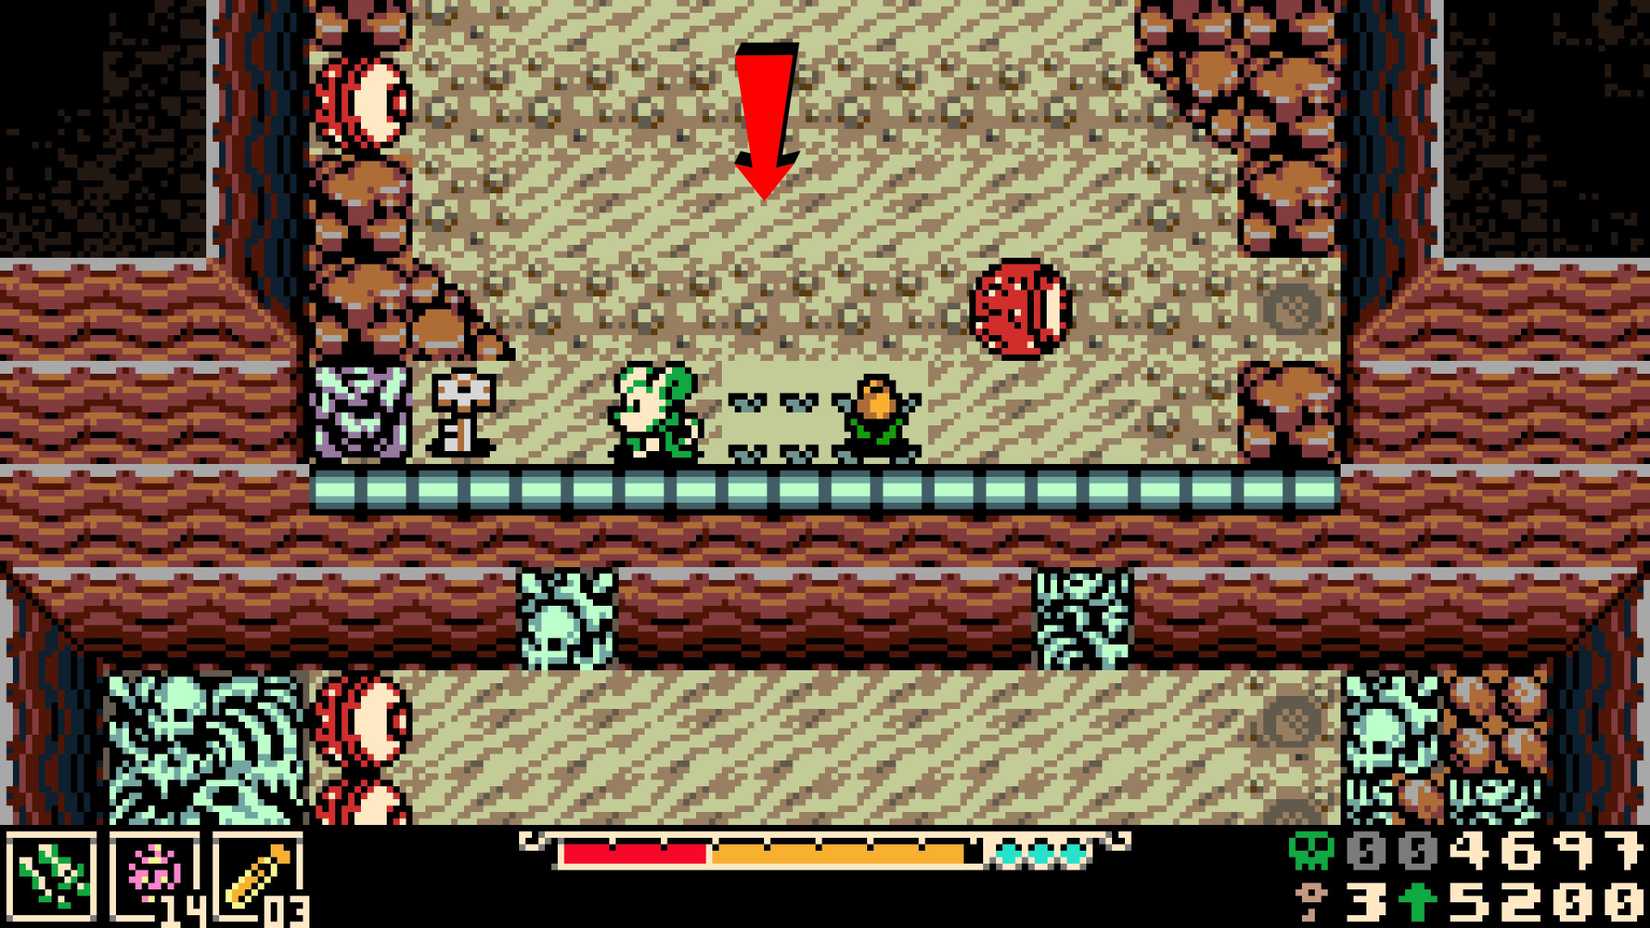
Inside a Hidden Hole in Mourner’s Mile
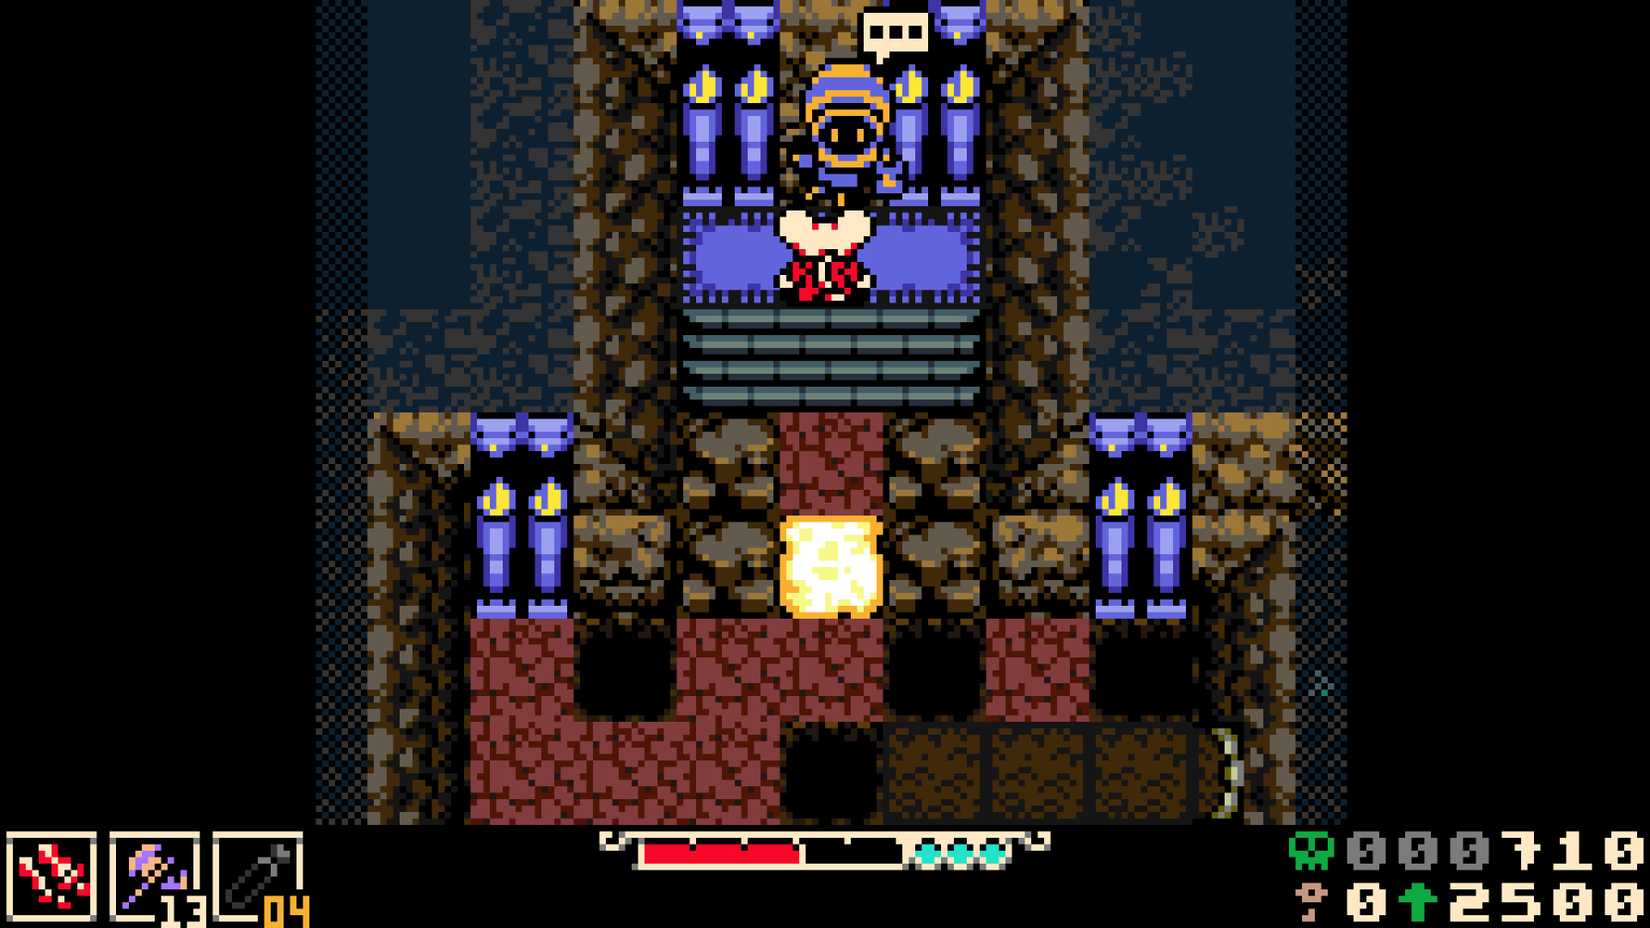
As you journey toward the Queensbury Crypt by traveling right from Ossex and crossing the bridge, you will enter a spooky graveyard known as Mourner’s Mile. The moment you step into a narrow corridor crawling with goblin ambushes and floating candles, push all the way to the far right edge. Look for a patch of loose dirt and burrow straight down into a subterranean chamber to find a hidden room with an armored knight, a goblin, and three more floating candles.
Clear the room, then shatter the cracked tombstone sitting in the bottom-right corner of the screen to step through a gap. While this room only contains some loose Bones, it allows you to peek into another hidden area on your left. Now, go back outside and destroy the third tombstone from the top, counting from left to right, to reveal a new hidden passage. Step inside, but ensure you do not strike or destroy the candles here, as they provide the illumination needed to safely guide Mina to a hidden Kear.
Kear 16
Inside a Mausoleum in Mourner’s Mile
As you journey toward the Queensbury Crypt by traveling right from Ossex and crossing the bridge, you will enter a spooky graveyard known as Mourner’s Mile. Progress until you arrive in front of a mausoleum-like structure guarded by an armored knight. Hook a left past him to continue, fighting your way through goblins and more knights, until you reach an armored guard positioned between rows of iron spikes. Defeat him and head east to stumble upon a cemetery.
Locate the second tombstone from the left in the top row, smash it to pieces to reveal an open hole, and drop down. In this lower chamber, carefully edge toward the left wall while avoiding the floor spikes to find a hidden passage lined with more hazards. Now, notice an out-of-place stone embedded in the left wall, strike it to collapse the illusion, and step into another secret room to claim your Kear.
Kear 17
With a Gravedigger in Mourner’s Mile
While exploring the outskirts of Mourner’s Mile just before stepping into the main entrance of the Queensbury Crypt, you will enter a screen featuring an exhausted gravedigger NPC hanging out in the upper-left quadrant of the map. Use your burrowing ability to dig right beneath the iron fence to reach him. Upon speaking with him, he will complain about how tired he is and mention that he still has far too many graves left to dig. To help him out, use your digging talents to excavate every single plot on the screen that features loose dirt directly in front of it. Once every grave is clear, return to the NPC (he’ll be celebrating, by the way) and speak to him to receive a Kear as a reward.
Kear 18
In a Secret Room in Queensbury Crypt
While navigating the corridors of the Queensbury Crypt, keep a lookout for a complex platforming room packed with massive rolling purple spiked cylinders and blue crows. Carefully edge your way down into the absolute bottom-right corner of this chamber and inspect the wall tiles. You’ll notice the stone geometry looks slightly fractured and asymmetrical, so strike the wall to reveal a hidden pathway leading into a secret room occupied by an unusual NPC. Simply smash the breakable object resting right next to him to reveal a Kear.
Kear 19
Buying from Belvedre in Queensbury Crypt
You need to buy this Kear with Belvedre, a hidden merchant in the Queensbury Crypt, for 300 Bones. To reach his shop, you must use your burrowing ability to access a hidden passage situated to the left of the pillar of the main corridor leading up to the boss’ floor (the hallway with two headless statues).
 Related
Kear 20
Buying from Poppit in Western Wilds
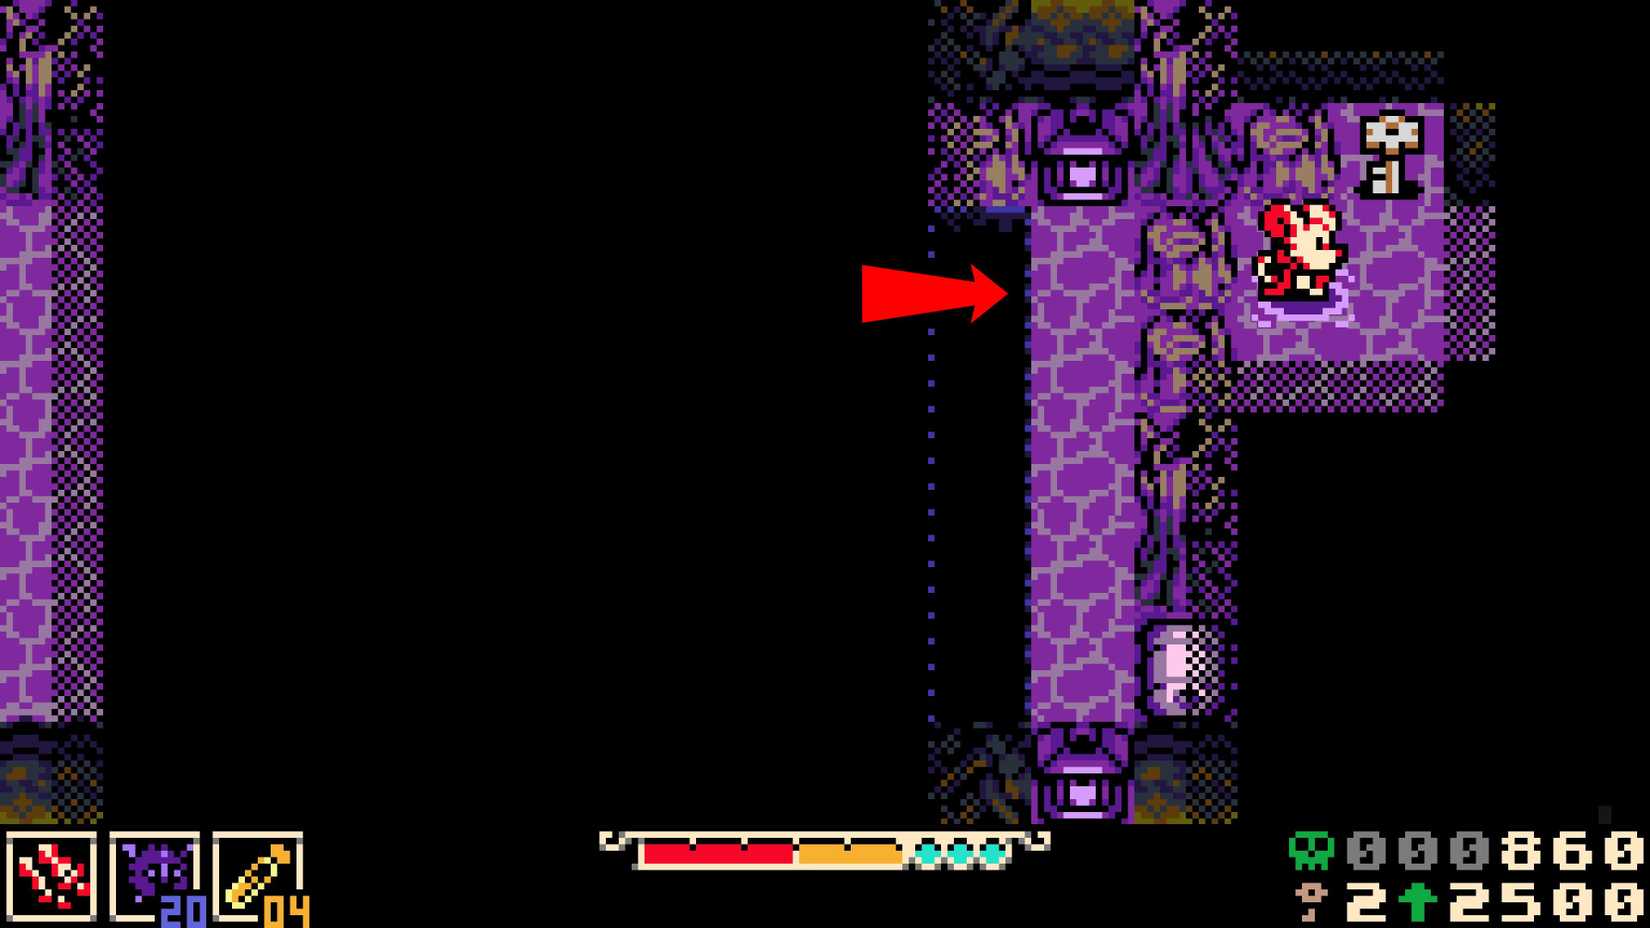
This one is locked behind Poppit’s second secret shop, hidden in Western Wilds. To get there, you need to progress in the region until you find the Molten Foundry cabin (it’s the only house on the upper side of the screen). When you’re inside, use the burrowing ability on the top right corner to find an underground path that leads you to the back of the cabin.
Here, you’ll be greeted by some flowing lava running across the floor and a lot of darkness, with both sides actually concealing secret pathways. To get to this Kear, you need to head to the left wall. To do that, you must burrow through the terrain to guide the stream of molten lava to clear and illuminate your path. Once through, you’ll find Poppit at the top of the screen.
Kear 21
After Helping NPCs in Ossex
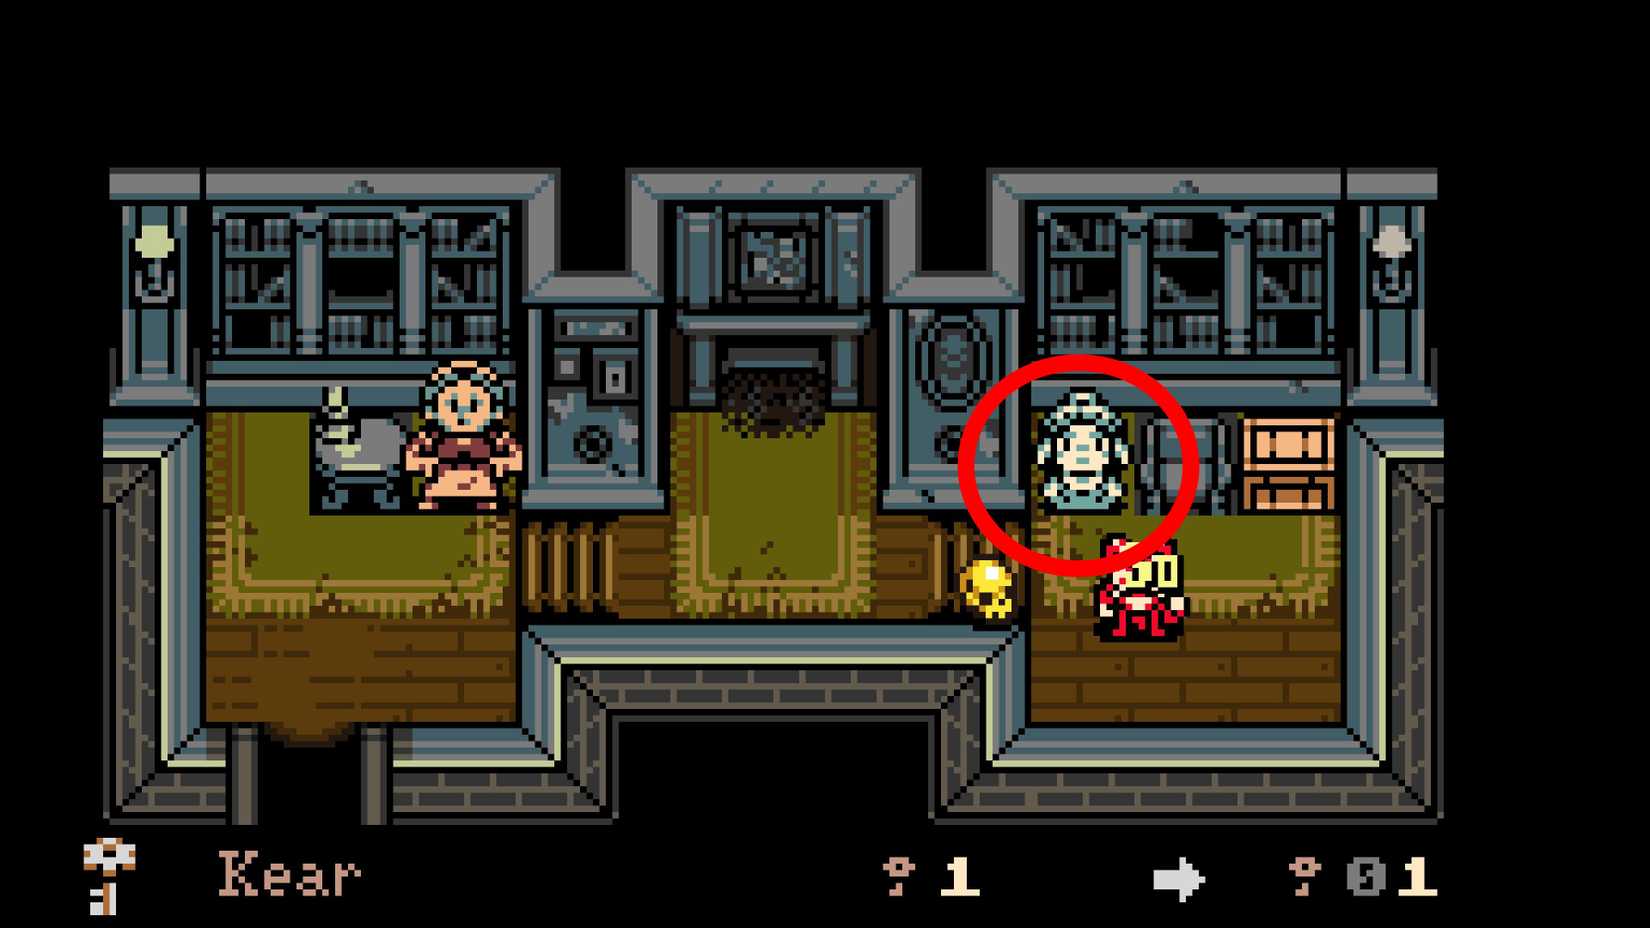
Before you attempt this one, ensure you have at least 500 Bones! Then, exit the main square of Ossex and head left to enter Bowery, the impoverished district of the city. Interact with every citizen wandering these streets and donate Bones to anyone who asks for some financial assistance. Next, push into the northern pathway at the top of the screen and speak to the NPC standing to your left, and hand over some Bones to him as well.
Backtrack to the main entrance of Ossex, loop around the shop situated on the left, and also donate to this NPC. Finally, navigate up to the higher “floor” of Bowery across the narrow, elevated wooden bridges (if you haven't unlocked this upper path yet, you must exit the town from the southern gate and loop around the Western Wilderness to open the stairs shortcut back into the city). Now, go to the end of this bridge, step inside the residential home, and speak to the NPC on the right. She will loudly commend your generosity across the city streets and reward your kindness with a Kear.
Kear 22
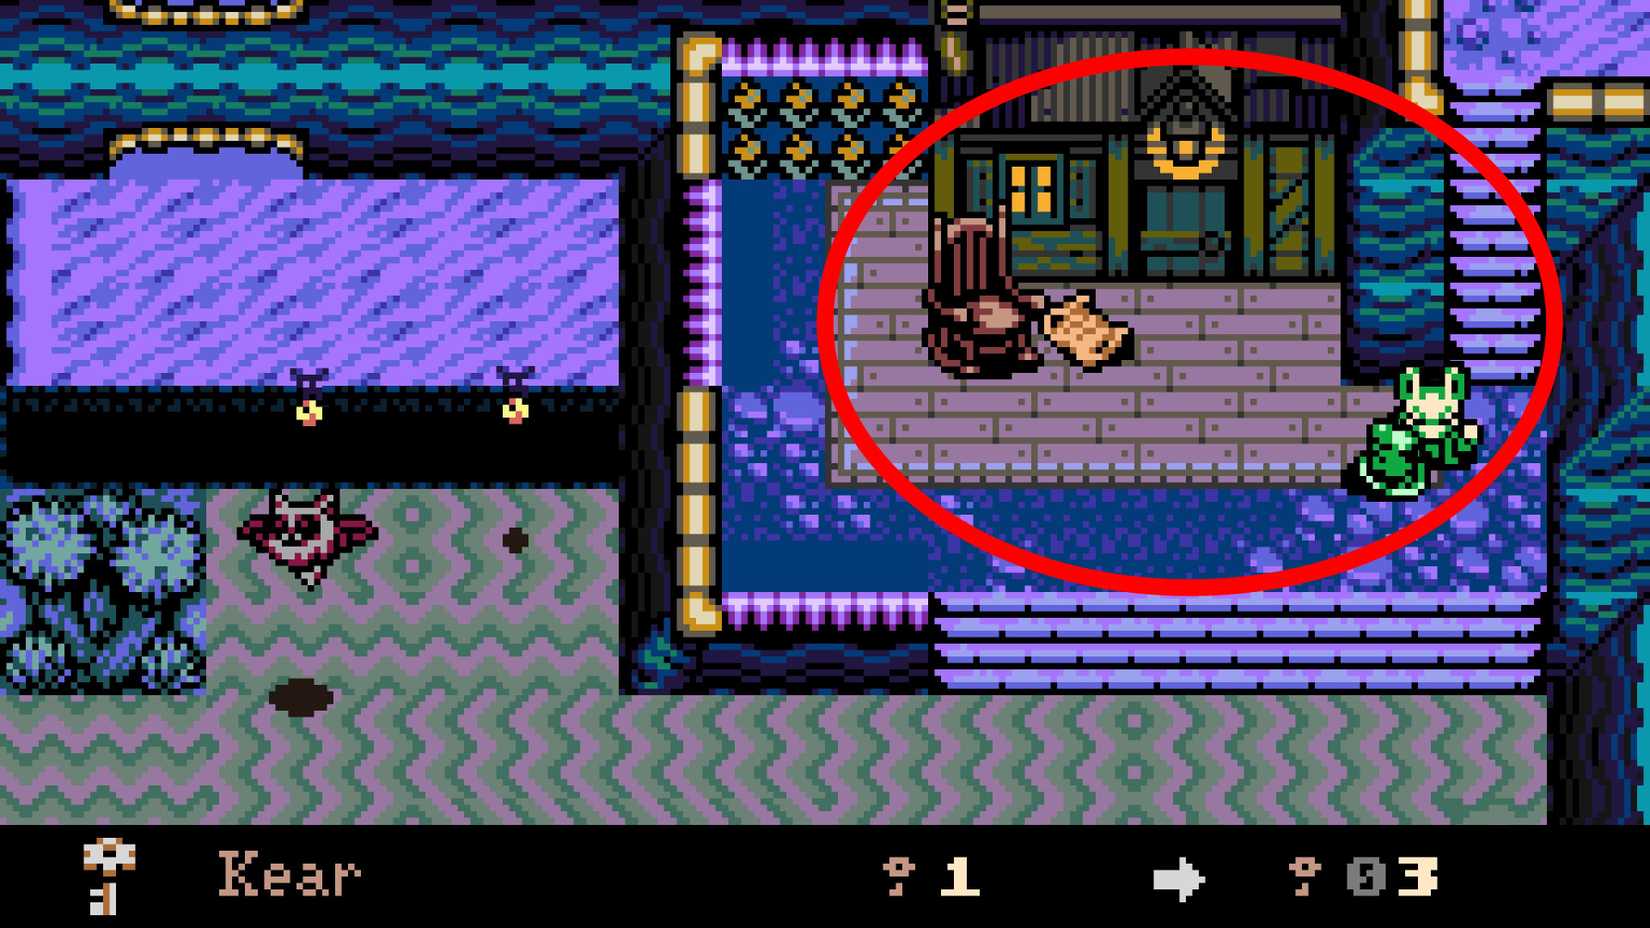
With an NPC in Blackwaters
While exploring the murky depths of Shanty Swamp in the Blackwaters region, advance through the wetlands until you step into an arena centered around a purple house. Move to the clearing directly in front of the house and use your burrowing ability to dig straight down into the house. The moment you drop inside, pay close attention to the candelabras and ensure you do not strike them, as doing so will plunge the entire room into pitch-black darkness! Now, inspect the small island on the left side of the room to spot an unusual flower embedded in the dirt. Burrow underneath it to reveal Lucky, a sleepy NPC who will hand over a free Kear.
Kear 23
Inside a Hidden Hole in Nox’s Bayou
When you’re exploring the dangerous areas of Nox’s Bayou, you’ll eventually reach a chaotic arena occupied by four fireball-spitting creatures. Battle your way to the top edge of this map and strike the boulder situated on the far left to reveal a hidden hole. Step through the opening to enter a dark tunnel inhabited by another fireball enemy. While he is hostile, his flaming projectiles illuminate the environment, allowing you to easily track his positioning. Close the distance, destroy the creature, and smash the treasure chest resting right next to where he was to grab a Kear.
Kear 24
Buying from Kindly Hag in Nox’s Bayou
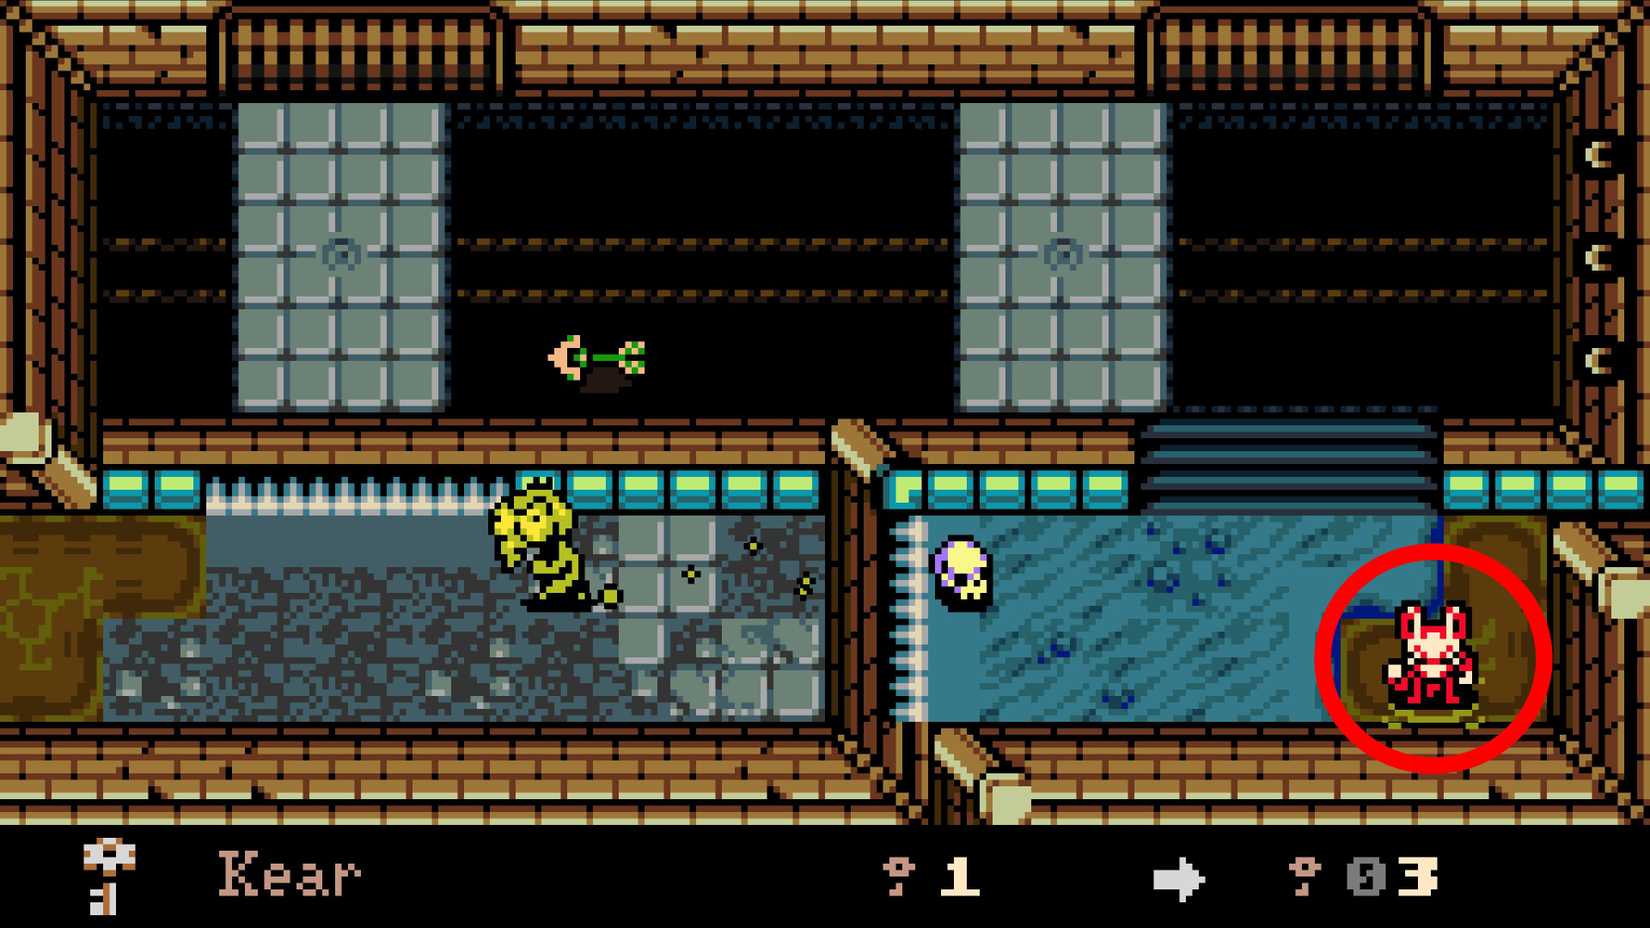
As you deeply explore Nox’s Bayou, you’ll eventually arrive at the Big Lagoon. After defeating the giant frog guarding the center of this zone and restoring the water levels, you’ll notice some aquatic steps that continuously materialize and vanish across the lake, alongside a massive patrolling alligator. Navigate to the northern edge of this wet arena to find a small wooden shack resting on the right side. Step through the front door to meet the Kindly Hag, a merchant who sells a variety of valuable gear, including a lovely Kear.
Kear 25
Inside a Hidden Cave in Nox’s Bayou
Push into the Thick Thicket area of Nox’s Bayou until you encounter a dangerous carnivorous plant mounted directly on top of a floating, moving platform, surrounded by several pests that hurl pairs of green projectiles. The moment you make your way down to the bottom edge of this vertical arena, you’ll catch a faint glimpse of a hidden cave entrance sitting right at the bottom-center of the screen.
To reach it, press Mina flat against the left wall and march directly downward until she disappears from the screen. From this blind spot, begin walking continuously to the right (you can jump to catch a glimpse of her positioning) until you step into the hidden cave we saw before. Once inside, hop across the small wooden boats floating in the chamber to reach the Kear.
Kear 26
Buying from Pinky’s Parlor in Blackwaters
On the opening screen of Blackwaters near the location where you first encountered Buffo (the large frog who gives you a Trinket and asks you to defeat 50 enemies with it equipped), look toward the right side of this area to locate a pink structure. Expend one of your Kears to unlock the path, which will lead you to Pinky's Parlor, a merchant who has a Kear for 300 Bones.
Kear 27
Buying from Poppit in Southern Outskirts
This one is at Poppit’s third and final secret shop, hidden in Southern Outskirts. Backtrack to the game’s opening tutorial zone and head east to explore the section that was previously cut off by raging wildfires. Utilize the high-jumping purple flowers to launch Mina across the gaps and enter the cave on the right.
Navigate through the cavern to exit from the eastern side, then push forward along this newly opened path to unlock two shortcuts (the upper floodgate and the lower rope). Use another purple flower to launch yourself up to the highest cliffside platform, clear out the two red crows alongside the armored giant, and press eastward into an opening adorned with purple decorations. Burrow straight down to enter the hidden shop, where Poppit will sell you a Kear for 300 Bones.
Kear 28
Buying from Brac in Bone Beach
While marching along the Bone Rush Trail within the sunny shores of Bone Beach, you’ll eventually reach the first area where you meet small, aggressive creatures that resemble floating brains with tentacles. And you’ll also notice a tent here (which is quite hard to miss). Step inside it to meet Brac, a merchant who is selling a Kear for 750 Bones.
Kear 29
Among Some Eyeball Enemies in Bone Beach
Continue through Bone Beach until you arrive at the first vertical area crawling with red rolling eyeball enemies. Carefully make your way upward, scaling the main rope, and go right. The moment you spot a cave entrance that is shaped to look like a roaring face, drop down the ledge and step inside. The interior features a crossroads patrolled by another eyeball. Time your movements to avoid entering its direct line of sight and take the lower pathway to drop down into a sub-chamber occupied by two more rolling eyeballs. Tucked away right below their patrolling route sits a lone treasure chest. Smash it open to claim your Kear.
Kear 30
Fake Tiles in Bone Beach
Deep within the monster’s belly dungeon, fight your way forward until you arrive at the Stomach Mine checkpoint. This facility features a central floating amygdala surrounded by a network of moving metallic hooks. Strike and defeat the amygdala (keep in mind it isn't a traditional enemy and won't attack, but colliding with its physical form causes serious bounce-back damage, so watch your spacing) to open up a fleshy hole that launches Mina up to the upper floor.
On this top tier, your goal is to figure out exactly where to intentionally drop off the ledges to land on hidden platforms back on the lower floor. To secure a Kear, begin by jumping across the silver moving hooks on the right side of the room while dodging projectiles from the two hovering octopuses. Drop off the far right edge directly underneath the bottom octopus to land perfectly in front of a Kear. However, there’s a barrier blocking you from it, so hop onto the purple puff creatures to go around the barrier and scoop up your prize.
Kear 31
Inside Mite in Sandfalls
This Kear is tied to the friendly old man and his companion insect, Mite, located deep within the Sandfalls region (the area filled with quicksand pits and explosive puzzles). There, you’ll find this friendly NPC hanging out with his pet. When you speak with him for the very first time, he will loudly criticize all the former residents who abandoned Sandfalls, proclaiming that he will stay put forever.
But when you come back here after defeating the main boss of Bone Beach, you’ll find that the old man has disappeared, leaving nothing behind but a note that reads, “just me and Mite, together in the end.” Then, defeat the creature that used to be his pet, which will cause it to drop the old man’s weathered hat along with a Kear.
Kear 32
Treasure Chest in Southern Sidearms
Stand at the main southern entrance of Ossex leading out of the city, and you’ll easily spot a treasure chest out of reach on the far left side of the screen. To reach this one, you must execute a clever backtracking loop. Return to Ossex and go to the “second floor” of the Bowery district, on the left side of the city (if you haven't unlocked this upper level yet, you must exit the town from the eastern gate, loop entirely through the Western Wilds, and unlock the stairs shortcut to gain access to the high ground).
Once on the upper walkways, cross the bridge and step inside the only available residential home, which is occupied by two female NPCs and a roaring fireplace. Use your burrowing ability to dive directly into the fireplace and follow the hidden subterranean tunnel to its end to emerge in front of a high-jumping purple flower. Burrow directly underneath this flower and carry it toward the right edge of the screen. Use its boost to launch Mina toward the next cliff (to clear the tall grass blocking the ledge, trigger your Drill Driver Sidearm mid-air, by the way). Once safely on the cliff, push into the next screen to find that chest from earlier and claim your Kear.
Kear 33
Under the Bridge in Eastern Heath
Cross the bridge of the Eastern Heath (by leaving from the right side of Ossex) and head down into the lower screen. Here, you’ll encounter a moving platform with two spike traps on top of it. Hop onto the platform and ride it to reach the opposite western shore, cutting down the tall grass to clear the way until you reach the edge of a lake.
Chop away the remaining grass in front of the shoreline to safely descend into the water, then immediately begin burrowing your way upward until you find dry land again, right under the bridge. Now, burrow again underneath the bridge to uncover a hidden room. Watch out for the aggressive enemy guarding the left side! After defeating him, step into the alcove that he was guarding to open a treasure chest containing a Kear.
Kear 34
Buying from Rupert in Coltrane Peak

As you explore Coltrane Peak, you’ll eventually find some complex railroad tracks, filled with red enemies that don’t move. Use the tracks to reach the top edge of this place and go left to find a snowman enemy. Defeat him, then use a Kear to unlock the barrier he was guarding to reveal a new path. Enter to find an NPC named Rupert, who will mention that he is hunting down a legendary artifact and begs for your assistance.
Agreeing to help him will cause him to immediately lose his footing, plummeting straight into the freezing waters below and sliding underneath the solid ice sheet. Use your burrowing ability and dive into the freezing water yourself, following the only path available until you spot an open clearing at the bottom of the ice sheet to save him! He will thank you by opening a shop, offering a variety of premium survival items – including a Kear for 1,000 Bones.
 Related
Mina the Hollower: 10 Best Bone Investments
Mina's got a bag of bones, and a whole isle of stuff to spend them on.
Kear 35
Near the Moving Platforms in Coltrane Peak
While exploring Coltrane Peak, you’ll eventually enter an area with moving wooden platforms, where you need to break the thin ice to make them move to reach a rope. When you are about to jump on the last moving platform to reach this rope, look for an opening on the left instead to find a hidden path, where you can find a Kear at its end.
Kear 36
Inside a Puddle in Western Wilds
Exit Ossex through the southern gate and follow the path on the left until you reach an area with two minotaurs and a blue crow. Defeat them and use the burrowing ability in the middle of the puddle of water (near the upper northern exit) to drop into a hidden cavern. Equip the Drill Driver Sidearm and trigger its mid-air dash to jump the bottomless pit inside, allowing you to reach the opposite ledge and pop open the treasure chest containing a Kear.
Kear 37
Win the Ghost Race in Sandfalls
You need to win the ghost race in the Sandfalls. First, you must collect over 10,000 Bones to fix the train station in Ossex, then fast travel to Bone Beach. Go up the stairs here to find a red ghost, then talk to him to accept his challenge: race him until the main square of Ossex, without using a single set of stairs, fast travels, or anything like that along the route. To easily cheese this, keep your Drill Driver Sidearm equipped at all times, triggering its aerial dash to fly over every staircase on your path. The trick is just to follow the ghost, then use the Drill Driver when you are nearing the fountain to reach 1st place! Your reward is a lovely Kear.
Kear 38
Near a Bed in Kindlewood
When you step into the first barn of Kindlewood, you are introduced to the burning torches puzzle, where you basically need to use them to burn away dense foliage to clear paths. Before moving to the next screen, notice that there is foliage near a bed on the left side of the scenario, so grab the torch and step onto the second moving platform (from left to right), right under the candelabra. Then, quickly throw the torch in the direction of the bed to burn the foliage, revealing a hole in the floor. Now, use the burrowing ability under the table to reach the hole, which leads to a secret room with a treasure chest containing a Kear.
Kear 39
Buying from Papa Madd in Kindlewood

As you press forward along the mandatory story path cutting through Kindlewood, you’ll eventually find your path blocked by a mini-boss known as the Madd House, which is literally a living, breathing monster home. Defeat it to return to normal. Doing so reveals that the home is actually a local shop run by Papa Madd, who will happily open up his storefront and offer a Kear for 1,000 Bones.
Kear 40
In a Treasure Chest in Kindlewood

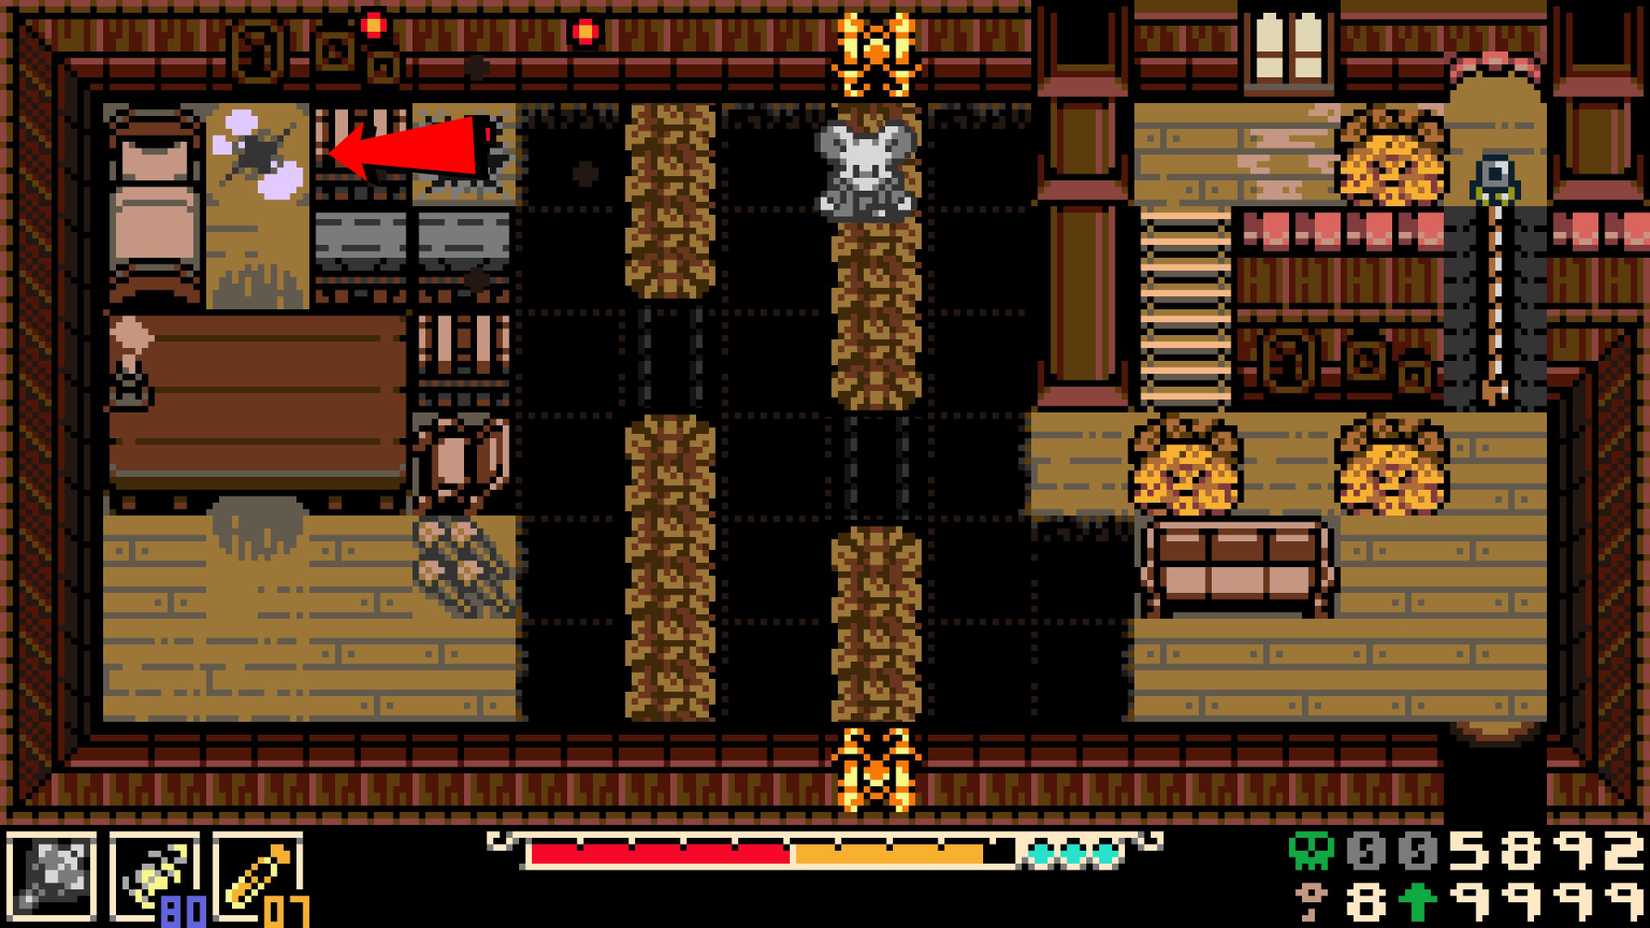
In the area where you first met Gourdan, a creature with a pumpkin head in Kindlewood, look for a hole on the left and use the burrowing ability on it to eventually reach a house (on the top of the screen). There’s a treasure chest here, but you can’t reach it (yet), so simply use a Subweapon to just break it and reveal a Kear. Now, break the candelabra to reveal an exit, and use the burrowing ability on it to reach the back of the house. Just force your entry on the left side of the back house to re-enter it, but on the entrance that leads to the Kear.
Kear 41
Interacting with a Scarecrow in Septemburg

While battling your way through Septemburg, you’ll eventually enter a large vertical arena crawling with crows and some farming enemies with scythes, alongside a checkpoint at the top of the scenario. Inspect the far left edge of the platform with the checkpoint to spot a hidden trampoline. Hop onto it to launch Mina onto a hidden pathway lined with consecutive trampolines that will continuously boost you upward until you land flat in front of a lonely scarecrow. Interact with him and choose the option to pull him down to the ground, which triggers a combat encounter as the scarecrow reveals itself to be an enemy. Defeat him to claim a Kear.
Kear 42
Behind a Wall in Septemburg

As you reach the chaotic segment of Septemburg with farming tractors where you must use trampolines to leap over them, pay close attention to the final tractor in the sequence. This vehicle will violently crash into the left wall, destroying it. Instead of continuing forward into the next mandatory screen, go left (where that left wall was) to find a hidden trail that eventually leads to a Kear.
Kear 43
Buying from a Scarecrow in Septemburg

Upon entering an open field area that features a single residential home surrounded by enemies wielding leaf blowers, your task is to locate and free various scarecrows tied to wooden crucifixes on the right platform. There are three of them, and two are dead. But the last one is still alive and, after you help him go down, he will reveal himself to be a merchant, offering a variety of gear, including a Kear for 750 Bones.
Kear 44
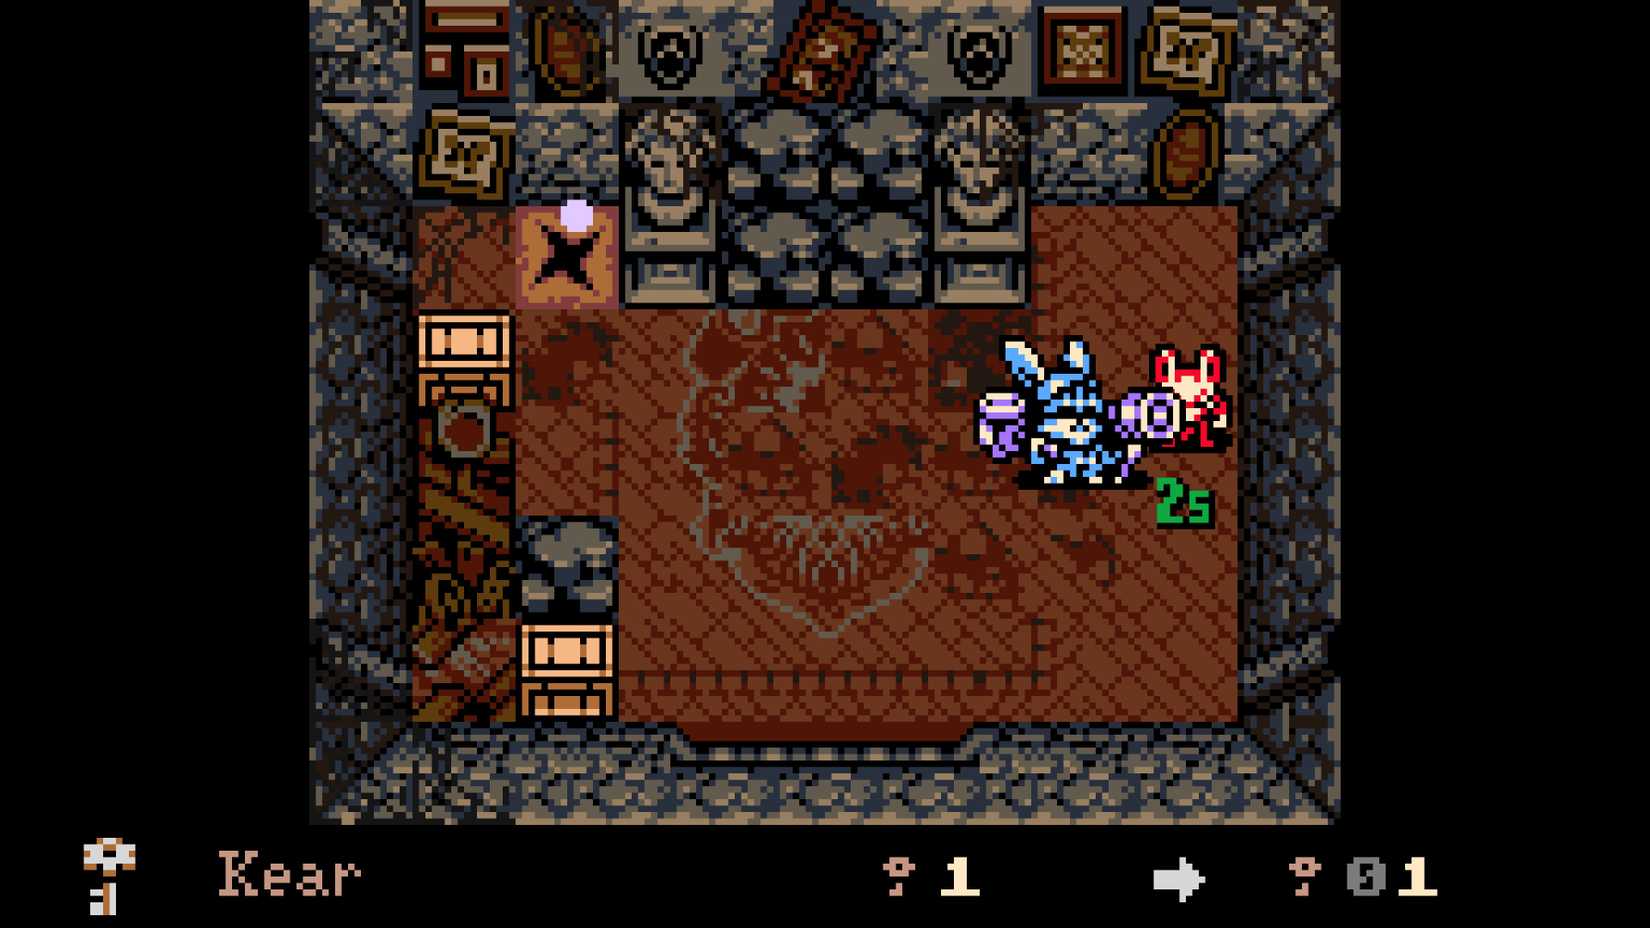
In a Treasure Chest in Septemburg

In the area where the terrifying “bogeyman” entity invaded your Underlab in the main story, there is a tree trunk with a distinct “X” carved into its bark in the bottom-right corner of the screen. Strike it to reveal a hidden path that leads to a treasure chest containing a Kear.
Kear 45
In the Crimson Mirror Area in Astral Orrery
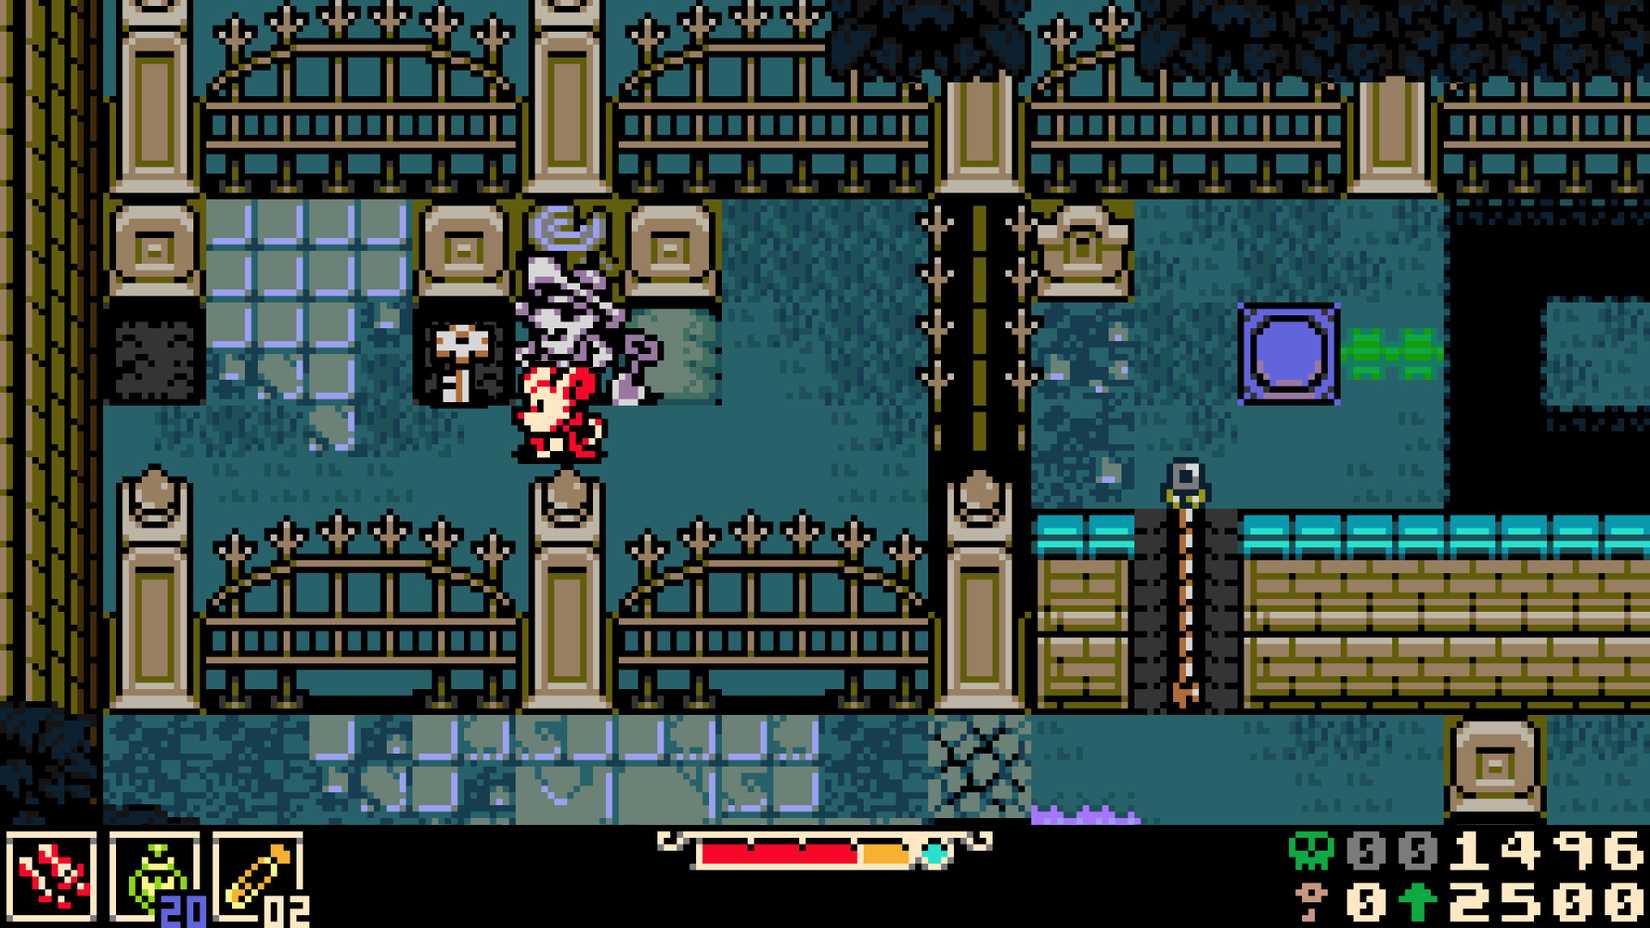
Within the cosmic puzzles of the Astral Orrery, you’ll need to hunt down four mystical mirrors scattered across the facility, which are distinguished by colours. And a hidden Kear can be found inside the sector dedicated to the crimson mirror!
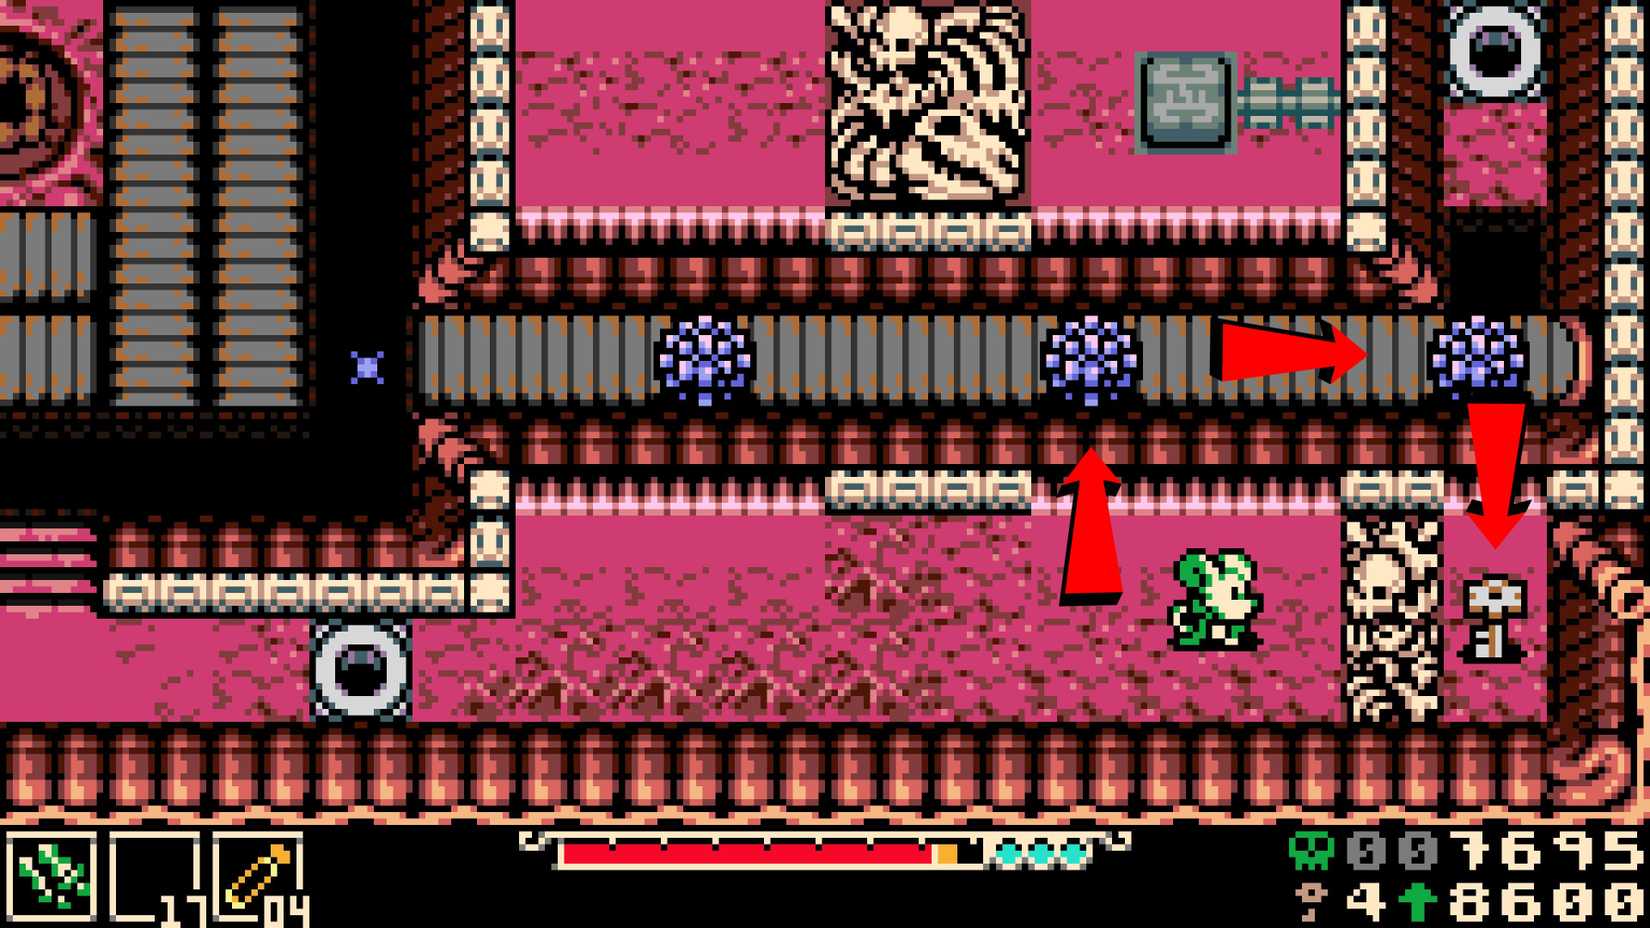
While exploring this part of the scenario, you’ll reach a complex platforming room where you must use rotating mechanical gear as platforms while hunting for blue squares to shut down the energy turrets. So, when you manage to get one of these blue squares, head to the far right edge of the screen, where three turrets are mounted in a row. Use the square to destroy the middle turret to reveal a hidden hole. Step through the gap to enter a secret chamber housing a Kear.
Kear 46
In the Green Mirror Area in Astral Orrery

Within the cosmic puzzles of the Astral Orrery, you’ll need to hunt down four mystical mirrors scattered across the facility, which are distinguished by colours. After you complete the green side of this puzzle, you’ll unlock two shortcuts with ropes in the main room. However, before using them, look closely at the left side of the screen to spot a strange alien creature floating inside an orange glass experimental test tube, with a sign indicating items for sale. Interact with it to reveal that he’s actually a shop (a quite weird one). And he has a Kear for 1,000 Bones.
Kear 47
In the Blue Mirror Area in Astral Orrery
Within the cosmic puzzles of the Astral Orrery, you will need to hunt down four mystical mirrors across the facility, which are distinguished by their distinct colors. While you are exploring the blue sector of this dungeon, you will eventually reach a segment where you must hit a switch to cause a network of purple portals to materialize. The exact moment you strike this trigger, pay attention to the platform you are currently standing on, as two purple portals will spawn to your right. Take a leap of faith and jump straight into them to emerge inside a hidden room with a Kear.
Kear 48
Under the Tracks in Coltrane Peak
When you’re exploring Coltrane Peak, you’ll find some interactive train tracks to progress. When you finish using the first set of these tracks (where a lone horned enemy is waiting for you), instead of moving forward, use the burrowing ability to dive underneath the railroad tracks. Then, navigate through the subterranean dirt toward the bottom-right corner of the screen and slip into the hidden hole. Inside this chamber, you’ll find some ice cubes and a chest with a Kear.
Kear 49
In the Trinket Bazaar Basement in Ossex

This one is hidden away within the locked basement of the Trinket Bazaar, which is one of the main shops for Trinkets in Ossex. However, gaining access to the lower level requires you to pull off a distraction, as the merchant will strictly block you from heading downstairs.
To break her guard, equip a fast-attacking weapon or Subweapon (the Volt Hatchet subweapon is a nice choice) and strike the merchant multiple times in succession. This will cause her spinning, shape-shifting face to accelerate into an uncontrollable loop, so rush to the locked floor hatch, use your burrowing ability on the lock to slip through, and drop into the basement. Once downstairs, simply speak with the defaced creature inside the cage to receive a Kear.
Kear 50
In the Cave With Invisible Floor in Southern Outskirts
To access the trail leading toward Bone Beach, the mandatory path will force you to explore the Southern Outskirts until you find a dark cavern with invisible platforms, enemies, and some loose Bones pointing where you can step. When you reach the final level of this place, you’ll face a dangerous enemy wielding a chain weapon. Defeat him, then trace the invisible tiles toward the far left edge of the area to spot an entrance in the bottom-left corner of the screen. Use your burrowing ability to dig straight into this crevice to enter a hidden cave, allowing you to scoop up a Kear.
 Next
Next


![ELDEN RING NIGHTREIGN: Deluxe Edition [FitGirl Repack]](https://i5.imageban.ru/out/2025/05/30/c2e3dcd3fc13fa43f3e4306eeea33a6f.jpg)
 English (US) ·