.png)
The "Equitable Distribution" priority contract for Traxus in Marathon is a chunky one, because it has four individual stages that can provide some tough hurdles to surmount. You'll be exploring both Perimeter and Dire Marsh, looking for data drives, summoning and scanning transport drones, and taking down a UESC Commander after hightailing it from one side of the map to the other. Yeah, this one is giving Marathon players some serious grief.
Here's a complete walkthrough for all stages of the "Equitable Distribution" quest in Marathon.
'Equitable Distribution' quest steps in Marathon
As mentioned, here are all four stages of "Equitable Distribution" in Marathon outlined:
'Equitable Distribution' (1/4) quest steps
In a single run:
- Acquire self-erasing data drive from the second floor of Hauler (0/1)
- Deliver data drive to DCON within the time limit (0/1)
'Equitable Distribution' (2/4) quest steps
In a single run:
- Summon transport drone via second-floor terminal in Algae Ponds (0/1)
- Exfil UESC supplies and drone manifest (0/2)
'Equitable Distribution' (3/4) quest steps
- Scan drones in the tunnels beneath Station (0/3)
- Deliver unstable gunmetal resources to DCON in Perimeter (0/7)
'Equitable Distribution' (4/4) quest steps
In a single run:
- Trace Commander location at terminal south of South Relay (0/1)
- Acquire credentials from UESC Commander (0/1)
Where to find the self-erasing data drive in Hauler
First up, you need to get yourself to Hauler, the runner-and-UESC hotspot on Perimeter. Much like in the "Data Reconstruction" contract, you must head to the second floor of Hauler. This huge vehicle is a maze of winding turns and corridors, but there are quite a few ladders around. If you're entering from the southeast doorway, take a right as soon as you step foot in the red illuminated room, go through the wide open doorway with glass panels on either side, then look right again to find a ladder.
 Graphic: Ford James/Polygon Images: Bungie via Polygon
The self-erasing data drive is in the northwest corner, in a long room with drawers sticking out and cables winding across the floor. Stay stealthy — Assassin is best for this thanks to its invisibility — and make your way around. The second floor of Hauler is basically one big loop, so you'll find it eventually, just keep an eye out for the HUD icon to appear. When you pick it up, you only have five minutes to complete the next objective though, so grab it when you're ready.
Where to deliver the data drive to a DCON
You need to take the data drive to a DCON next, which is essentially a disposal bin. There are four in total on Perimeter, and the closest is in Overflow, to the south. Get out of Hauler and make your way down there.
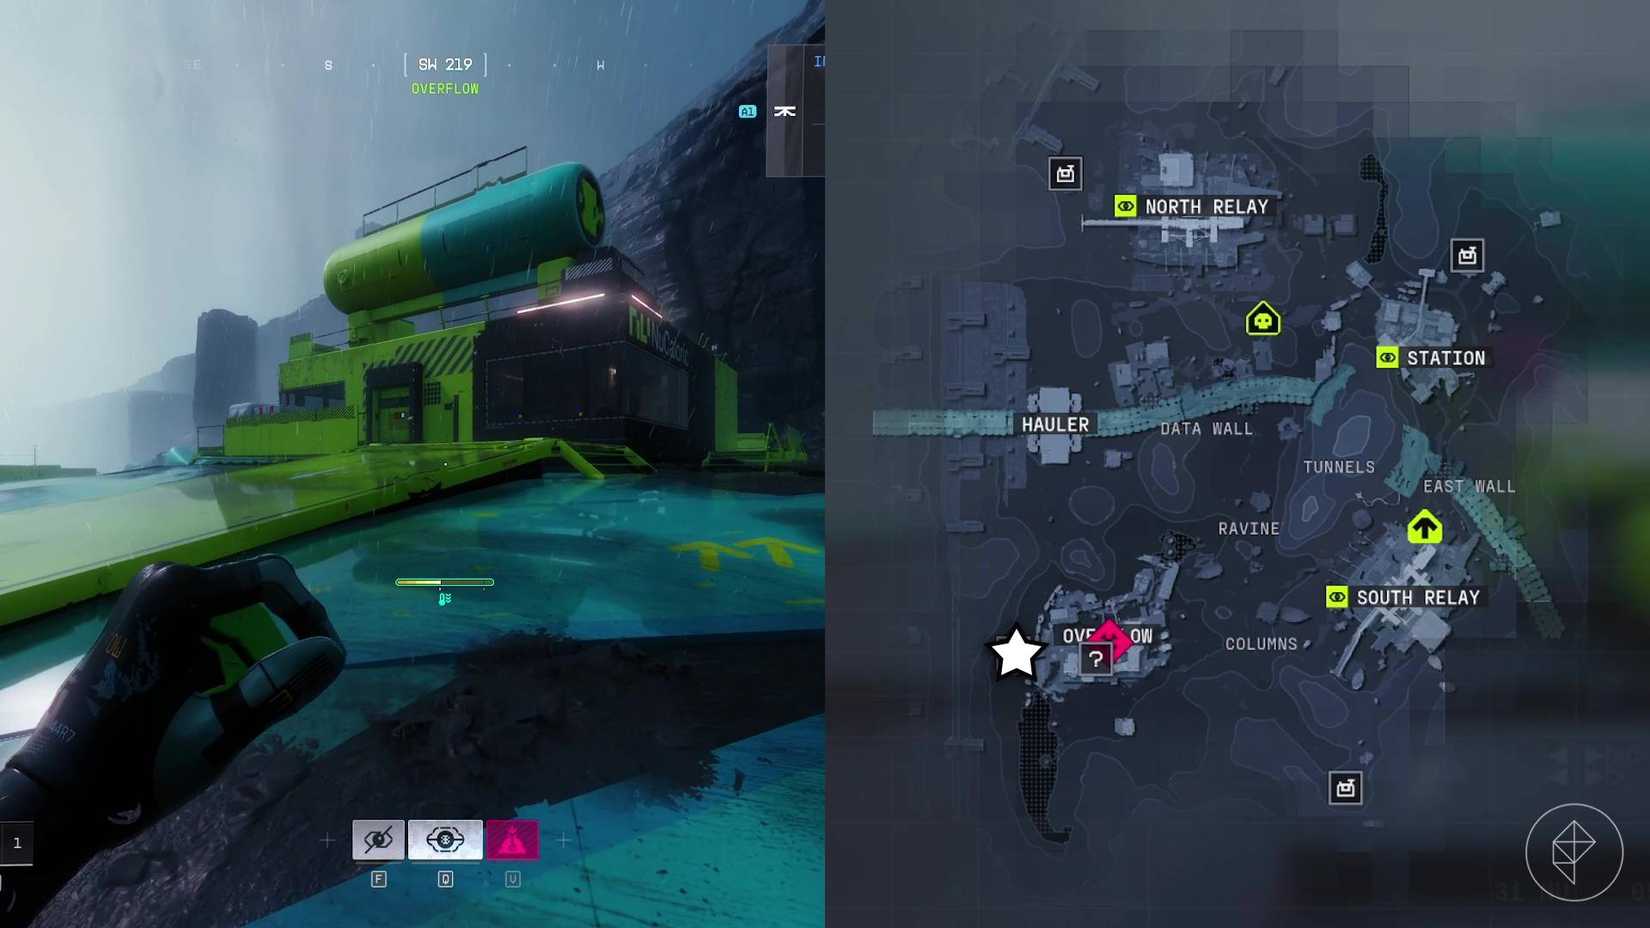 Graphic: Ford James/Polygon Images: Bungie via Polygon
The DCON can be found on top of a small building to the far west of the location. It's lime green and grey, with a cylindrical platform on the roof, and NuCaloric written on the side, at the top of a gentle green ramp. The exact location is marked on the map above.
 Image: Bungie via Polygon
The DCON itself looks like a small device, white and red with black stripes around the base. Interact with it and place the data drive inside to complete the objective.
Where to summon the transport drone in Algae Ponds
 Image: Bungie via Polygon
Next up, you need to load into Dire Marsh and head to Algae Ponds. This location, much like Hauler, is usually teeming with players and UESC enemies. The building you're looking for is also in the aforementioned "Data Reconstruction" quest, except this terminal is at the other end of it.
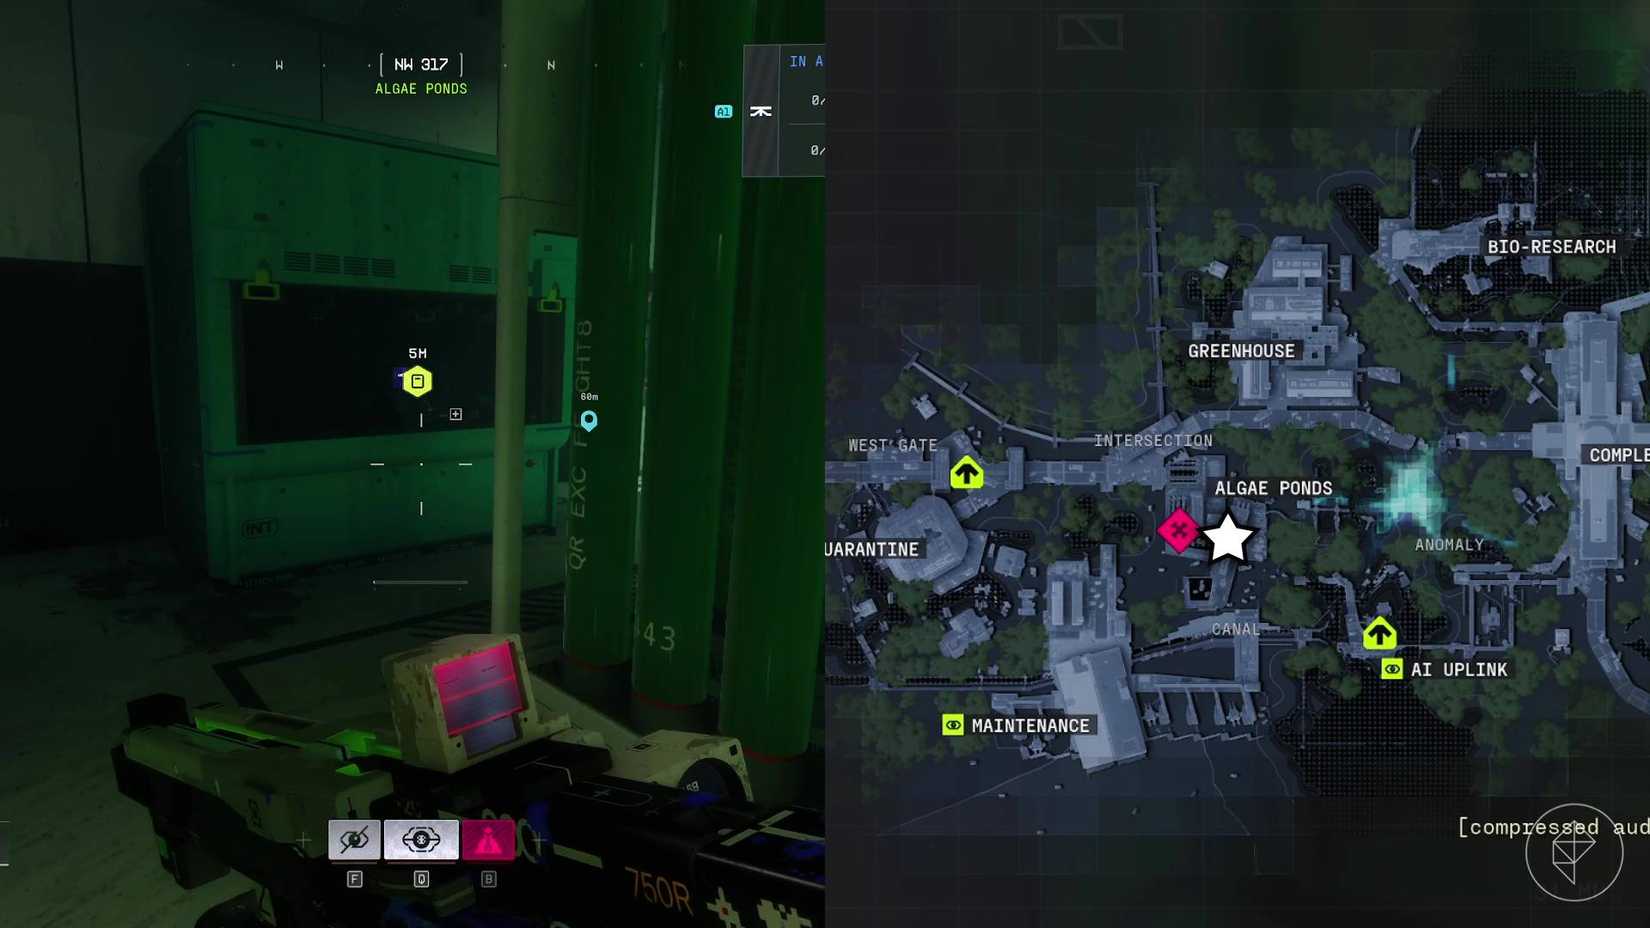 Graphic: Ford James/Polygon Images: Bungie via Polygon
When you get to Algae Ponds, climb up to the raised building with a bright cyan and grey exterior. When you're on the second floor, head towards the southern end, and you'll find the terminal to summon the transport drone in a dark corner, behind some green pipes.
How to exfil the UESC supplies and drone manifest
 Image: Bungie via Polygon
Interacting with the terminal will summon the transport drone, which will be marked on your HUD with the standard lime green quest icon. It will fly in from the southeast, so if you have a longer range weapon, you can shoot it down with ease from the roof of the building. If you're rocking something shorter range, you'll need to get closer.
 Image: Bungie via Polygon
When you take it down, rush to loot it before anyone comes to ambush you. You'll be able to put both the supplies and the drone manifest in your inventory.
Now all you need to do is exfil safely, which can be the hardest part. Head to your nearest one, lay low, and get out to complete the second stage of "Equitable Distribution."
Where to scan drones in the tunnels beneath Station
 Image: Bungie via Polygon
On to the third stage now, and it's back to Perimeter. This time, you need to head to Station, or more specifically, the tunnels that run underneath. These are most easily accessible from within Station itself though, so we'd recommend heading for the very middle of the area, keeping an eye out for UESC enemies, as there are often a fair few around here.
 Image: Bungie via Polygon
You're looking for the main entrance, a huge vehicle-sized doorway at the end of a long grey, covered bridge. Alternatively, you can enter on the floor below, which has a big orange door. Whichever entrance you choose, head southwest, further into the facility and you'll find the Tunnels area.
 Graphic: Ford James/Polygon Images: Bungie via Polygon
Run past the room with floor-to-ceiling glass windows and through the doorways draped with translucent plastic sheets, and you'll find the first drone you need to scan. It's essentially an underground hangar for drones. Climb onto the lip of where it's held and interact with it to scan.
 Image: Bungie via Polygon
Head past it and take a left, and the next objective icon should appear on your HUD. This drone is on a big shelf above you, but you can use the drone on the ground to jump off of. Clamber up to find the one to scan.
 Image: Bungie via Polygon
Finally, head to the other end of the hangar, past the vehicle with the white tarp covering it. The last drone is above you again, so you need to use this covered vehicle as a climbing frame. Head to the top and scan it to complete the objective.
Throughout your entire time in Station, you should've found plenty of unstable gunmetal, because it's abundant in these parts. I had 17 by the time I'd scanned the three drones, but if you haven't found enough yet, continue looting Station.
 Graphic: Ford James/Polygon Images: Bungie via Polygon
You need to take this unstable gunmetal to the nearest DCON, which is at the very north end of Station. It's a standalone building, with the same exterior and layout as many of the small, unremarkable buildings you'll find on Perimeter, and as per usual, the DCON is on the roof. Interact with it, stick seven unstable gunmetal in there, and your objective will be complete.
Where to trace the Commander location at a terminal south of South Relay
 Graphic: Ford James/Polygon Images: Bungie via Polygon
"Equitable Distribution" (4/4) is here, and this is by far the most frustrating because you have to get from one corner of Perimeter to the other as quickly as possible. If you spawn near North Relay, I'd recommend writing off this objective for that round, because hightailing it all the way to South Relay, then back again — as you need to return to North Relay afterwards — is enough to drive anyone crazy.
 Graphic: Ford James/Polygon Images: Bungie via Polygon
If you do spawn somewhat close to South Relay though, the building you need is as far south as you can get, in a small, enclosed area of the map surrounded by cliffs. Beware though: the doors are blocked by security lasers, and there are claymores on the outside. The safe way in is by climbing up to the roof, breaking the hatch, then shooting the claymore inside through the hole. When you drop inside, turn around, shoot the next claymore behind the stack of shelves, then go inside.
 Image: Bungie via Polygon
However, before you can leave the building, you need to destroy the four red batteries powering the security doors. There's one in each room. Once these are broken, interact with the terminal in the middle of the main room, then leave the building. This will give you an objective at North Relay, where you must intercept an incoming UESC Commander. That's almost 800 meters away though, so get your walking boots on.
How to acquire credentials from the UESC Commander
As you'd expect, you need to kill the UESC Commander to get the credentials, but if you're doing this quest solo, it is incredibly tough to cross the entire map without being seen. The safest path is usually to go through Columns, Ravine, then cut through the hole in the middle of the Data Wall. From there, you can skirt around the outside of North Relay and make it to the spot where the Commander will spawn, which is just four minutes after you interact with the terminal in the South Relay building.
 Graphic: Ford James/Polygon Images: Bungie via Polygon
Of course, the Commander has some pals, so use everything at your disposal to take it down. It's a beefy foe as it has purple shields, but if you come equipped with a couple of grenades, it shouldn't pose too much of a problem.
It's worth noting that if you do this quest as part of a trio, you can send one player to activate the terminal, while the other two wait around North Relay for the Commander to spawn. That saves the requirement of legging it across the entire map.
When the Commander is dead, pick up the credentials off the ground, and congratulations! "Equitable Distribution" will be complete. Make sure you also read our guides to "Survival Directive" and "Order/Chaos" for more contract help, and we also have guides to all of the weapons, classes, and more in Marathon.


![ELDEN RING NIGHTREIGN: Deluxe Edition [FitGirl Repack]](https://i5.imageban.ru/out/2025/05/30/c2e3dcd3fc13fa43f3e4306eeea33a6f.jpg)
 English (US) ·